Unleash the full potential of our software with our comprehensive Knowledge Center, offering detailed information on its functionality and features.
PLANNER: Truck, Toll & Tour Calculation
ORDERS: Order Management
ORDERS: Offer Management
FLEET: Execute With The DriverApp
DISPATCH: The Dispatch Board for Trucks
DRIVERAPP: Order Execution & Truck Navigation for Drivers
Managing Master Data
Integrations
Help Center
Manage Bulk Products in Transport Orders
Managing bulk products in IMPARGO lets you plan, price, and track cargo that's measured by tonne, litre, or cubic metre — cement, gravel, grain, fuel, milk, waste, gases, and more. This guide walks through creating bulk products on the fly when you build an order, attaching them with prices and quantities, how cost and price calculate, reusing them in templates, reviewing the summary across the order detail view, PDFs, and the order's Events tab, and what your customers see on the tracking links you share with them.
A bulk product in IMPARGO is any cargo you measure by quantity rather than counted units — cement by the tonne, diesel by the litre, nitrogen by the cubic metre. Each bulk product belongs to one of three types: Solid, Liquid, or Gas. You define them once when you first need them and reuse them across as many orders as you like.
An order works with one cargo type at a time — either loading units or bulk products, not both. You handle a bulk product on an order the same way you would a loading unit: add it to a stop, set the quantity and rates, and dispatch.
When to Use a Bulk Product
Solids: cement, gravel, crushed stone, grain, sand, construction waste.
Liquids: diesel, heating oil, raw milk, used cooking oil, chemicals.
Disposal goods: cargo whose costs apply at unloading rather than loading — used cooking oil collected for biodiesel processing, construction waste taken to a landfill, etc. Mark these with the Disposal flag when you create the product.
If you can weigh, meter, or measure your cargo by volume — it's a bulk product. If you count discrete pieces (pallets, containers, parcels), it's a loading unit. An order works with one type at a time — either loading units or bulk products.
2. Create a Bulk Product
Bulk products are created in context — directly inside the order where you first need them. You don't have to leave the order to define a new product, and once created, the product is available for every future order in your account.
How to Create a Bulk Product While Building an Order
Step 1: Open the Orders module. Go to apps.impargo.de/orders and create or open the order where you first need the new product.
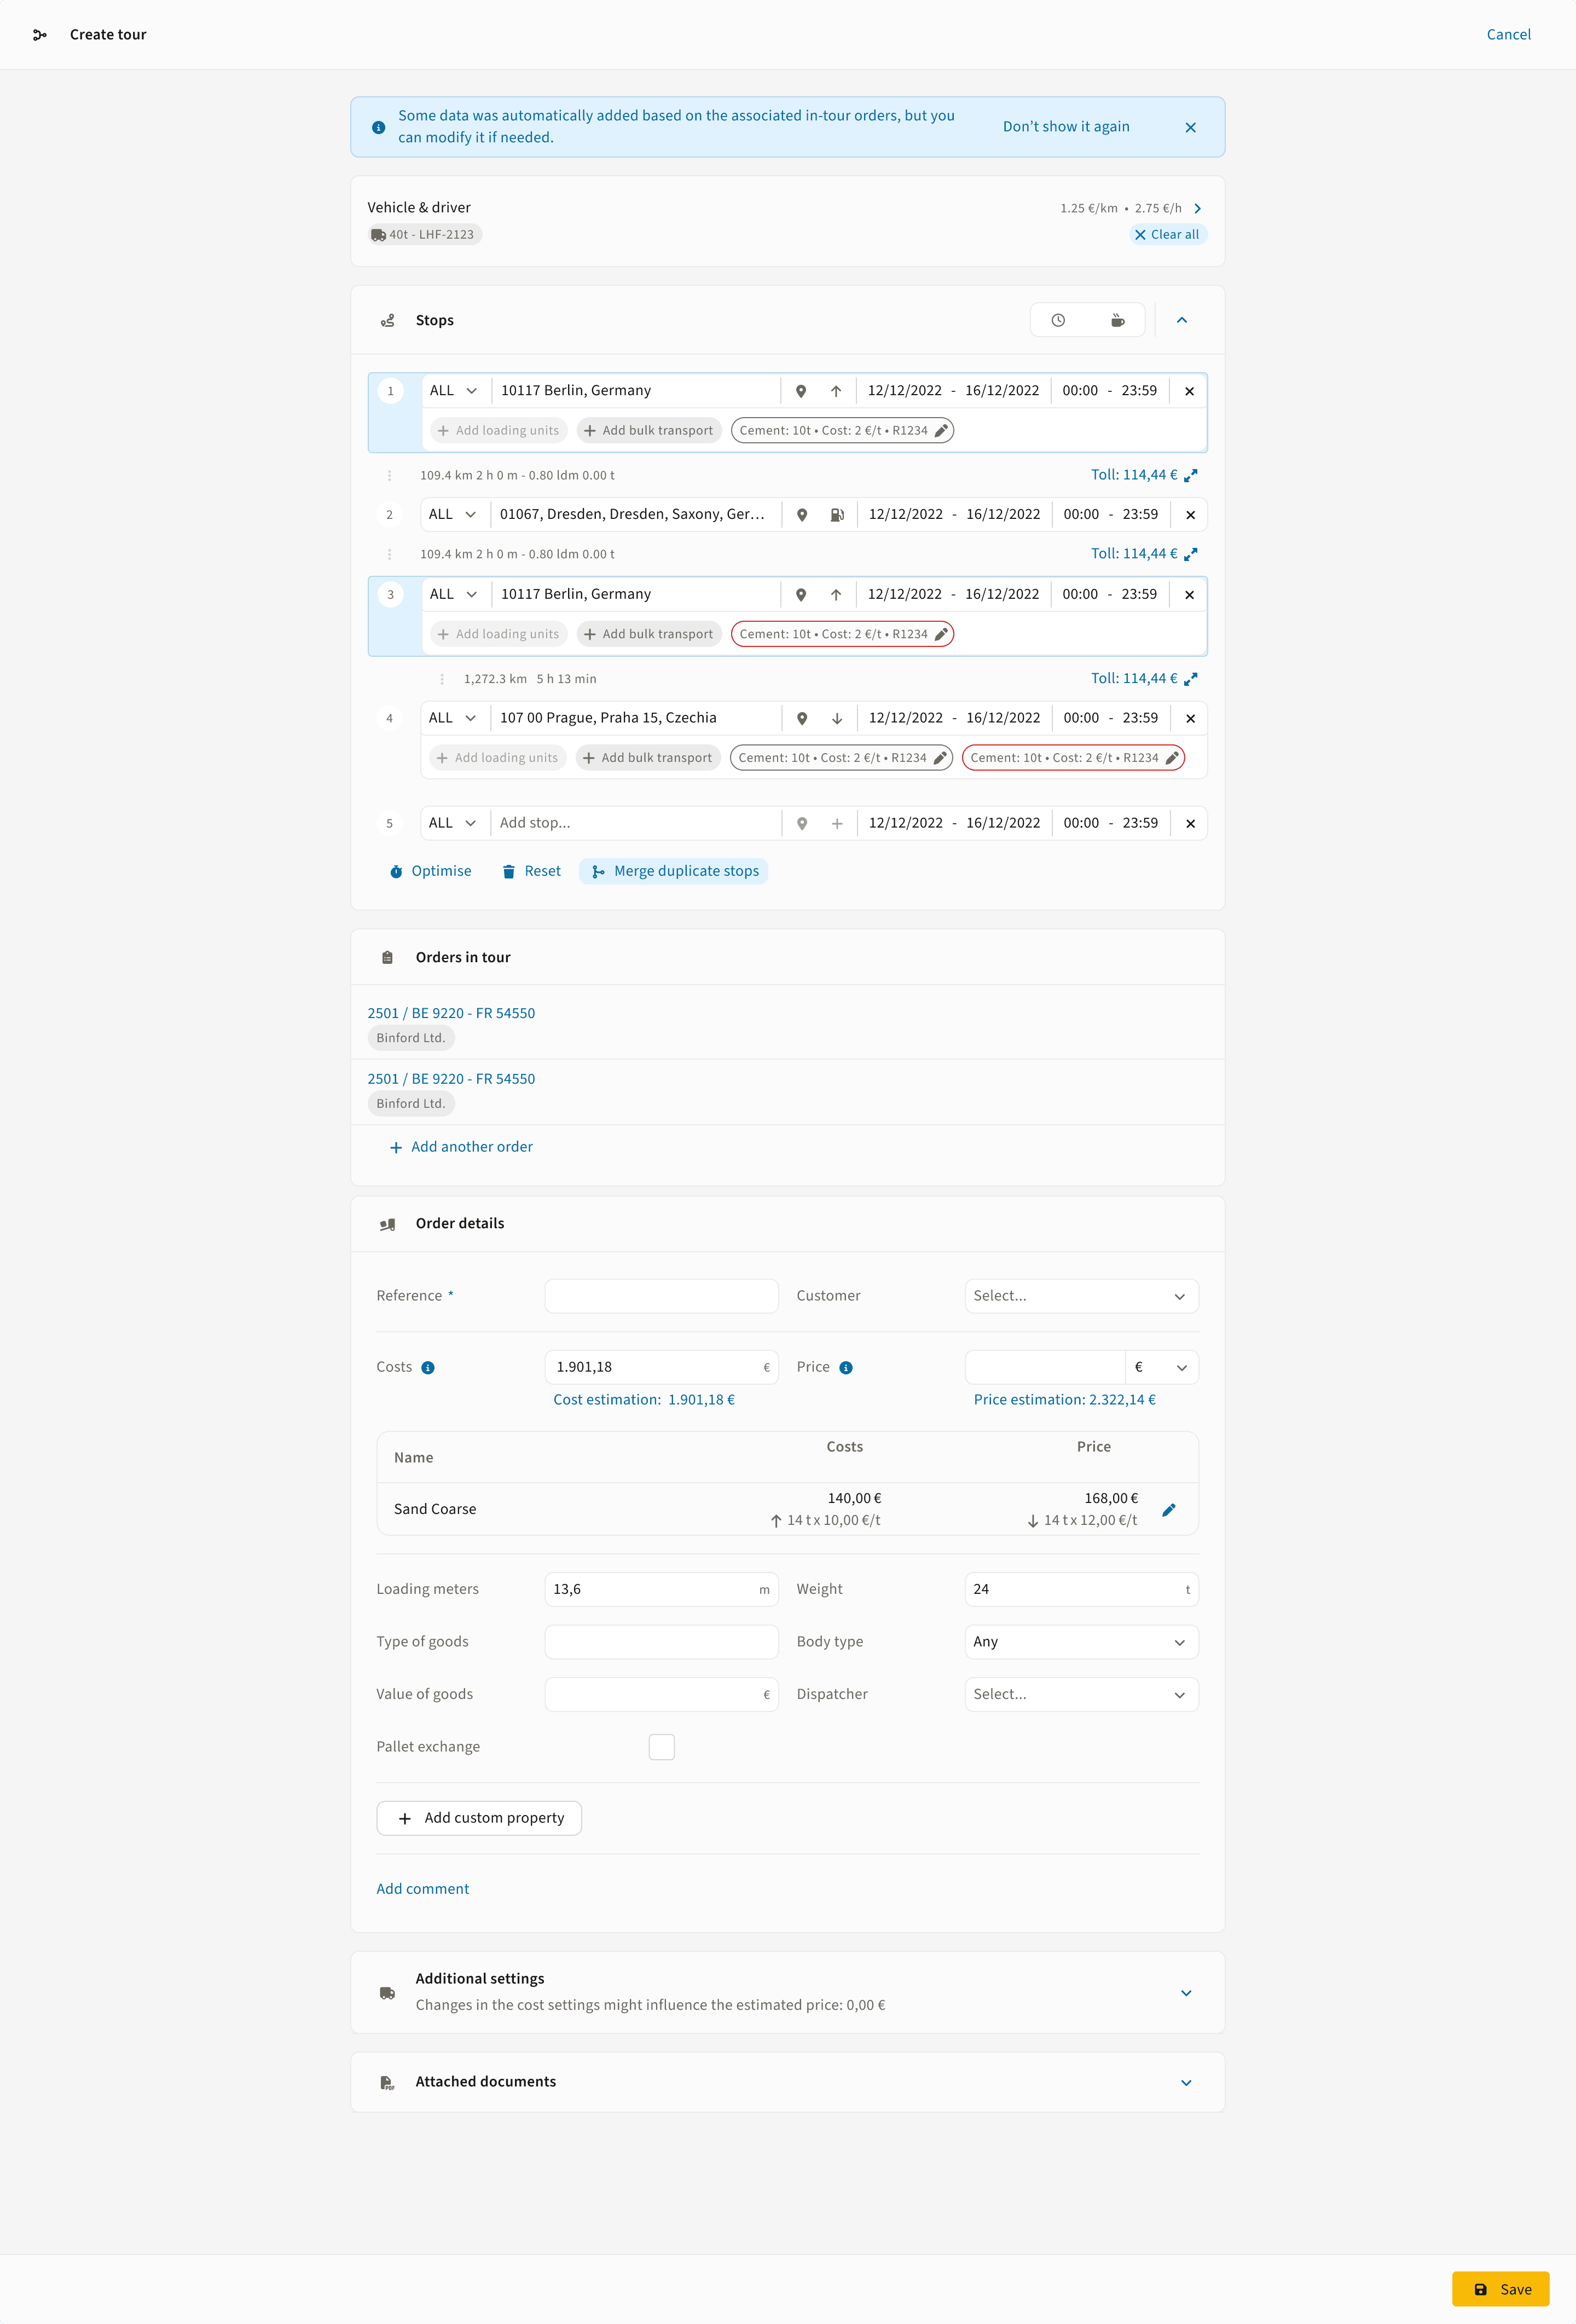
Step 2: Open the Add bulk product modal. On the loading or unloading stop, click + Add bulk product directly under the stop. (In the Orders module the button sits as a component button on each stop. In the Planner module you would first open the stop activity panel — see §3 for the Planner flow.)
Step 3: Open the Type dropdown and choose "+ New bulk product". The dropdown lists your previously used bulk products as presets. The first entry is always + New bulk product — click it to open a second modal layered on top, where you can define the new product (Type, Description, Unit, Disposal flag) without losing your order context.
Step 4: Save the new bulk product. The new product is saved to your account, the second modal closes, and the original Add bulk product modal now has your new product preselected as the Type. Continue filling references, quantity, cost, and price as normal. From now on, this product appears as a preset in the Type dropdown for every future order.
3. Attach a Bulk Product to an Order
Once a bulk product is defined in your account, attaching it to an order takes seconds. In practice you'll attach it across a loading stop (where it's picked up) and an unloading stop (where it's delivered).
There are two paths to attaching a bulk product depending on which module you're working in: the Orders module (faster, direct button on each stop) or the Planner module (route-first workflow, requires opening the stop activity panel first). The data you enter and what the driver sees are identical, only the entry path differs.
How to Attach in the Orders Module
Step 1: Open the Orders module. Go to apps.impargo.de/orders and create or open the order.
Step 2: Add your stops. Add the loading stop where the product is picked up and the unloading stop where it's delivered — the normal setup for a bulk run.
Step 3: Click + Add bulk product directly on the stop. Under each stop, the loading-unit and bulk-product component buttons sit inline. Click + Add bulk product right there. The Add bulk product modal opens immediately — no stop activity panel to open first.
Step 4: Fill the Add bulk product modal. Select the Type, enter a Description if it varies from the master record, choose the matching Loading stop and Unloading stop, and enter a required Load reference (e.g. LR-2026-04891). The Unload reference is optional.
Step 5: Enter quantity and pricing at both ends. At the loading stop, enter the planned Quantity (in tonnes, m³, or litres depending on the product unit) and your internal Cost per unit. At the unloading stop, confirm the Quantity delivered and the Price you charge the customer. Quantities at the two stops can differ — useful for disposal goods or routes with measured losses.
Step 6: Confirm. Click Add bulk product in the modal. The product line is now attached to both stops, and the stop row produces a summary.
Step 1: Open the Planner module. Go to apps.impargo.de/planner and build the route for the order you're working on.
Step 2: Add your stops. Add the loading stop and the unloading stop for the run on the route.
Step 3: Open the stop activity panel. Unlike the Orders module, in Planner the bulk-product button is nested. Click the stop activity (+) button next to the address to expand Additional stop data, then click + Add bulk product.
Step 4: Fill the Add bulk product modal. Same as the Orders flow: select Type, set Description, match Loading stop and Unloading stop, set the Load reference (required) and Unload reference (optional).
Step 5: Enter quantity and pricing at both ends. Same field set as in Orders: planned Quantity, Cost per unit at loading, Quantity delivered and Price at unloading. Quantities can differ between the two stops.
Step 6: Confirm. Click Add bulk product. The product line attaches to both stops and the stop row produces a summary — identical to the Orders module result.
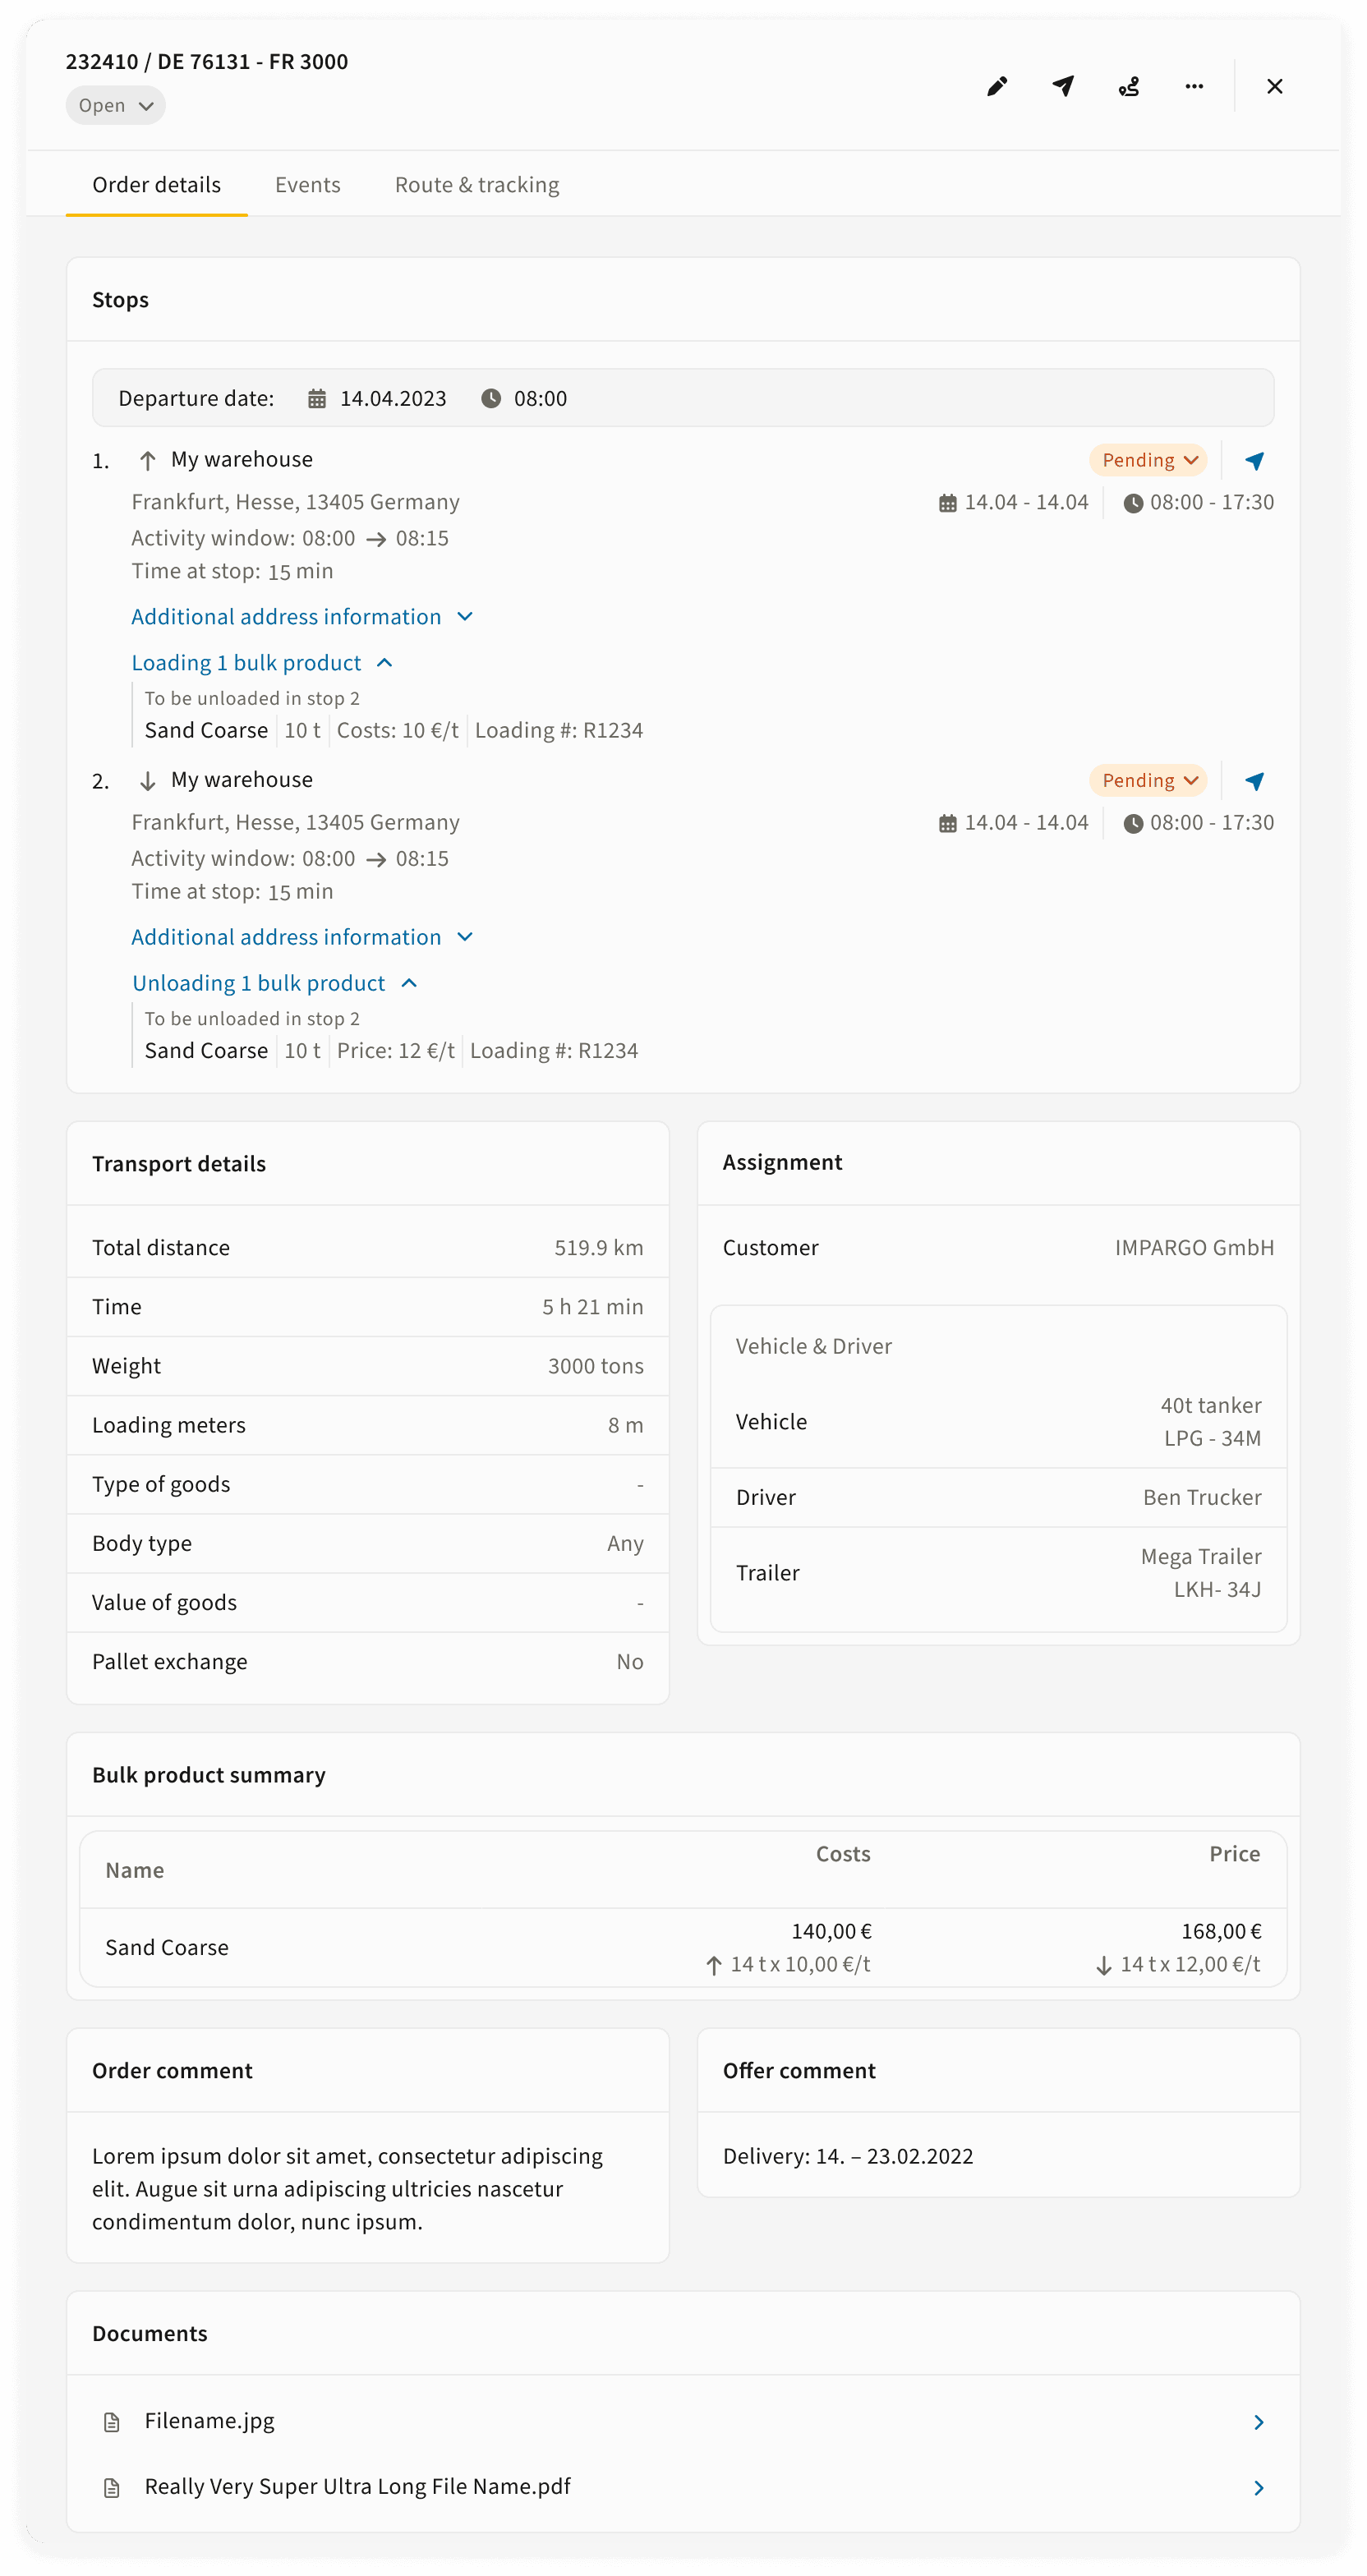
After you attach a bulk product, each stop row shows a compact summary directly inline — for example Cement: 10t · Price: 3 €/t · R1234 with an edit icon to reopen the modal. The summary is your at-a-glance check that the product, quantity, price, and reference match what you intend. Click the edit icon on either stop to adjust the figures without rebuilding the entry.
Sending the Order to the Driver
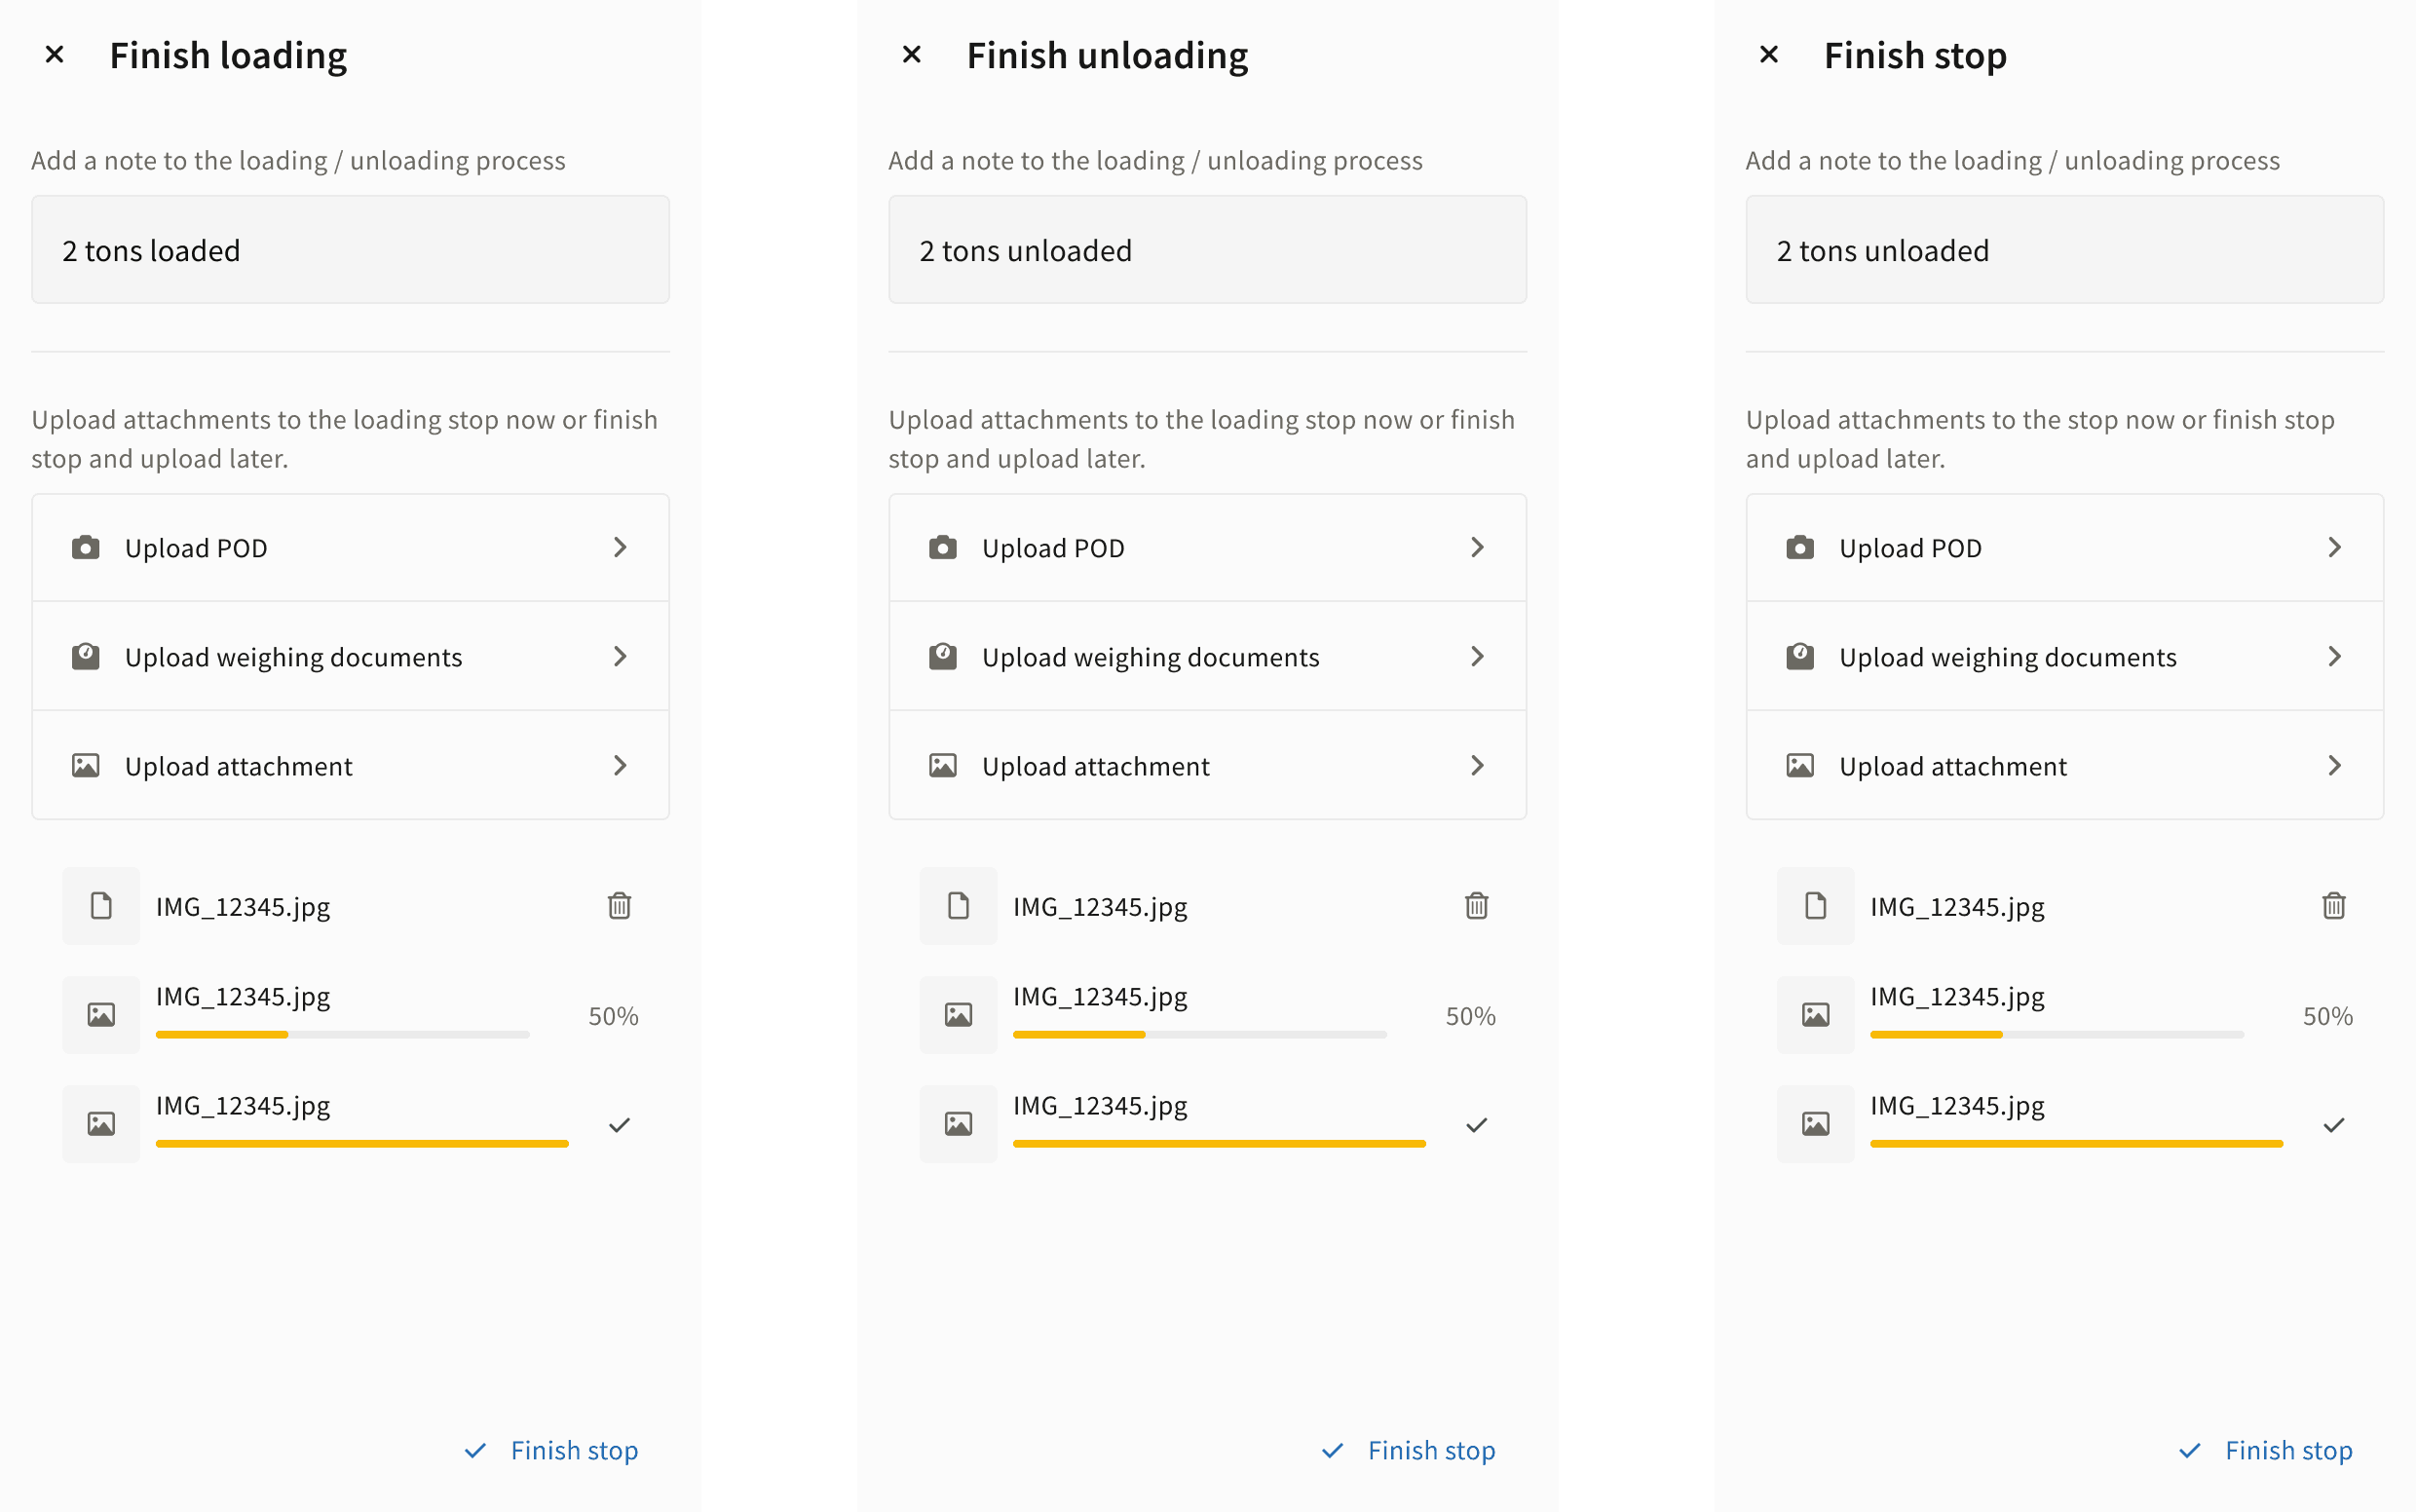
Once the bulk product is attached and the summary looks right, dispatch the order to your driver. The full bulk product detail — type, quantities, references, and the loading/unloading stop pairing — arrives in the driver's mobile app within seconds, ready to be processed at the weighbridge (truck scale).
Tip
Load reference is required because that's the value the driver will see in the DriverApp and the value that appears on your delivery paperwork. Use a format that makes sense for your operation — e.g. LR-YYYY-NNNNN or your customer's PO number.
4. Cost and Price Calculation
Every bulk product feeds two separate totals on the order: your cost and your price. The bulk product is only one line item — it's added to the other costs, not put in their place.
How Cost and Price Are Built
Your Total costs are everything the order costs you, added into one figure:
The bulk product cost is one line alongside the others — it adds on top, it doesn't replace anything.
Your Price is what you charge the customer: the price per tonne × delivered tonnes, plus the toll if you pass it on. Set the price so it covers your Total costs and leaves a margin on top — that margin is your Profit (Price − Total costs).
If Profit turns negative — the Price sits below your Total costs — the order would lose money. That's your signal to raise the price with the customer, or find a way to bring the costs down.
Example — 24 t of cement
The cement line: your cost 1,00 €/t → 24,00 €, your price 45,00 €/t → 1.080,00 €. Total costs 856,79 € — vehicle, trailer, driver, fuel & lubricants, toll, surcharges, plus the 24,00 € cement cost. Price 1.244,62 € — 1.080,00 € (24 t × 45,00 €/t) plus 164,62 € toll passed on to the customer. Profit 387,83 € — Price minus Total costs. The price covers everything the haul costs you and still leaves a margin.
Reading It On Screen
At the bottom of the map, the results bar gives you the full read-out for the order:
Distance — total kilometres for the route Time — estimated operational time Cost per KM — your cost per kilometre Total costs — everything the order costs you Toll (with VAT) — toll for the route, incl. VAT Price per KM — your price per kilometre Profit — Price minus Total costs Price — what you charge the customer
Your bulk products feed two of these — Total costs and Price. The rest comes from the route, the vehicle, and the toll calculation.
Tip
To compare routes before you quote, duplicate the order in the Planner Module and check that the price still covers your costs with a healthy margin.
Inside the order detail view, you'll find an inline cost and price breakdown table with three columns: Name · Costs · Price. Each bulk product is one row, and a totals row sums the order. The notation ↑ 24,00 × 1,00 €/t shows the quantity and rate; an upward arrow means the driver reported more than planned at the weighbridge, a downward arrow means less. The arrow direction reflects what the driver reported via the DriverApp.
5. Save Bulk Products in Order Templates
Recurring lanes — your weekly cement run, the daily milk pickup, the standing diesel delivery — don't need to be rebuilt from scratch every time. Save the order as a template and the bulk product travels with it: quantity, cost, price, references, and the loading/unloading stops are all preserved.
How to Save and Reuse a Template
Step 1: Build the order once. Configure the order completely — customer, vehicle, driver, stops, bulk product attached with quantity and rates.
Step 2: Save as template. Use the Save as template action and give the template a clear name, e.g. Weekly Cement Delivery — Plant A → Site B. The bulk product, with its full set of fields, travels into the template ready for reuse.
Step 3: Reuse from the orders list. From the Orders list, click New from template, pick the template, and a new order opens with the bulk product already attached. Adjust the date and reference codes for the new run and you're done. You can also create several copies of an existing order in a single action — useful when the same load goes to multiple sites in the same week.
Once saved, the template surfaces in the same detail layout as a regular order — bulk products, shipment status fields, and customer details all visible in one view. This makes it easy to audit your templates at a glance, confirm that the bulk product, quantities, and references are exactly what you want for the recurring lane, and edit any field before promoting the template into a fresh order.
Templates are shared across your whole team — anyone in your dispatcher team can launch a new order from a saved template. Name them consistently (lane, frequency, customer) so the list stays scannable as it grows.
6. View the Bulk Products Summary
Once an order has bulk products attached, the summary surfaces in three places: the order detail view (inline under each stop), the generated PDFs (when you choose to include them), and the order's Events tab (driver-confirmed events).
Bulk Products in the Order Detail View
Open any order with bulk products and each one appears inline as a pill under its stop — exactly like a loading unit — showing the product name with its quantity and cost so you can identify it at a glance. Click a pill to open the full detail with quantity, rates, and references, or to edit it.
On your generated PDFs — order confirmation, delivery note, invoice — bulk products show inline, just like loading units. There's no separate bulk-products table.
When the driver acts on a bulk product line in the DriverApp, the order's Events tab records it in full. Click the order to open the order detail drawer, then switch to the Events tab to track everything that happened — the driver arriving, quantities adapted, loading and unloading finished, the proof-of-delivery and weighing documents themselves, and any skipped items — each one stamped with the time and the order item it relates to. This is the complete audit trail. The Fleet chat mirrors only a thin slice of it, so the Events tab is where you go for the full picture.
When you share a transport tracking link with a customer or partner — the standard public link IMPARGO generates per order — bulk product details travel with it. The recipient sees the same loading stop, unloading stop, and product information that's visible in your dispatcher view, without you having to send screenshots or PDFs separately.
What the Customer Sees
The tracking link shows the bulk product type and quantity per stop, the planned versus actual delivery moment, and any driver-confirmed updates as they happen. Sensitive figures — your internal costs, margin, and the inline price breakdown table — stay private inside your dispatcher view. The customer gets the operational view that matters to them; you keep the commercial view that matters to you.
Tracking links are read-only by design. Customers cannot edit quantities, add comments, or trigger workflow steps — only your dispatcher and the assigned driver can. This keeps the audit trail clean while still giving customers full visibility.
Manage Bulk Products Across Every Order, Every Lane
From a single tonne of gravel to a fleet of cement, diesel, and grain runs — IMPARGO tracks quantities, prices, costs, and driver-confirmed deliveries in one place. Templates for recurring lanes, automatic recalculation when the weighbridge differs, and full PDF and Events-tab audit trails included.