The Address Management feature in the CargoApps is a powerful tool designed to help you efficiently organize and handle all your addresses. Accessible from the sidebar of the CargoApps Dashboard, this function simplifies the process of adding, editing, and categorizing addresses based on your specific requirements.
1. Access Address Management
Click on the “bookmark” icon. Find it on the sidebar of the CargoApps dashboard. This will open the "My Addresses" table, providing a comprehensive list of all the addresses you've saved.
2. Navigate “My Addresses” Table
In the "My Addresses" table, you'll find detailed information for each address entry, such as:
Address Name: A reference name for the address.
Address Details: Includes zip code, city, country, street, and additional comments.
Contact Details: Information such as contact name and contact number.
Category: Each address entry can be categorized based on your preferences.
Actions Available:
Add Address: Easily add new addresses to the system.
Edit and Delete: Next to each address entry, find options for quick editing and deletion.
Search Functionality:
Built-in Search Field: Utilize the search field to quickly find specific addresses, saving valuable time.
Step 2: Click on "+New address" found in the top right corner
Step 3: Enter address details
Address Information: Enter the address details, including the address itself with zip code, city, country, and street.
Location Name: Provide a name for the location to easily identify and reference the address.
Contact Person: Optionally, enter the name of the contact person associated with the address.
Contact Email and Phone Number: Include the contact person's email and phone number for reference.
Address-specific Comments: Add any relevant comments or notes specific to this address.
Category Customization: Customize the category for the address, including color and naming. Click on the blue "Edit" icon next to categories for customization.
Note: Categories help organize addresses based on your specific needs.
Step 4: Finalize address creation
Review the details for accuracy.
Click on the "Create Address" button to finalize the address creation process.
Additional Tips:
The data entered will be provided to the customer through the tracking link, and to the driver in the DriverApp.
Categories can be customized to suit your organizational needs for easy address organization.
Step 2: Click on the import option. Look for the import option situated on the top right corner, next to the search function.
Step 3: Upload the file containing the address data that you wish to import.
Note: Ensure the file format and structure align with the import requirements. Importing streamlines the process of adding multiple addresses at once.
6. Edit Address Time Settings
The Dispatcher Time Planning feature enhances Address Management by enabling users to assign customized time settings for specific addresses. This includes specifying time allocations at stops and defining two operational time windows, ensuring precise scheduling and seamless planning for each address.
Step 1: Access the Address Table Navigate to My Addresses.
Step 2: Select and Edit Choose the address you want to update and manually edit the following fields:
Time at Stop
First Time Window
Second Time Window.
B. Import Addresses: For New Users
Step 1: Access the Address Table Navigate to My Addresses.
Step 2: Locate the Import Function Find the Import button in the top right corner.
Step 3: Upload the File Upload a prepared file that includes the following fields:
Time at Stop
First Time Window
Second Time Window
C. Import Addresses: For Existing Users
Step 1: Access the Address Table Navigate to My Addresses.
Step 2: Locate the Import Function Click on the Import button in the top right corner.
Step 3: Upload and Merge Upload the prepared file. During the process, select one of the following options:
Merge: Updates existing records based on Name and Coordinates. Fields not included in the import file will remain unchanged.
Duplicate: Creates new records for all imported addresses.
Step 4: Confirm and Complete Review the import summary and confirm to finalize the update.
Important Notes on Merging
Duplicate Identification: The system identifies duplicates based on the combination of Name and Coordinates.
Non-overwritten Fields: Fields not included in the import file (e.g., comments) will remain unchanged in existing records.
7. Set Default Time for Stops
The Dispatcher Time Planning feature improves Address Management by allowing users to configure default time settings for stops. This includes predefining time allocations and setting two standardized operational time windows, ensuring consistency and efficiency across all planned stops.
How Address Time Planning Works
Saved Addresses with Time Management: When you add your time settings (Time at Stop and Time Windows), they are automatically applied in the Planner or Order Creation Module.
Addresses Without Time Settings: The system will apply default time settings.
Note: Time windows are defined by time only (e.g., 09:00–11:00) and are not date-specific.
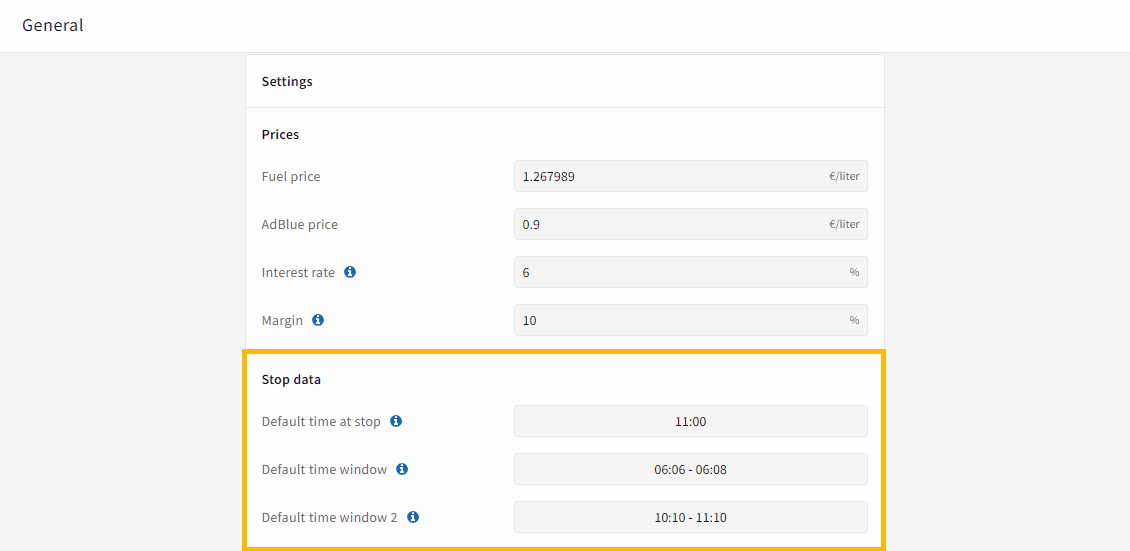
How to Set Default Time Settings
Step 1: Navigate to Settings Access the system settings where you can configure default time management fields, including:
Time at Stop
First Time Window
Second Time Window
Step 2: Apply Default Settings These settings will automatically apply to stops or addresses without predefined time management.
Step 2: View addresses on the map. On the top left corner of the interactive map, utilize the map layer options to select or unselect addresses based on categories.
Step 3: Add stops. Click on addresses to add them as start, stop, or in-between points. Alternatively, use the address search bar for quick access.
9. Save Addresses via The Planner
Method 1: Save from Address Entry:
Hover over the location pin icon next to each stop.
Fill in contact information and comments as needed.
Click on "Save to my addresses" to quickly save the stop as an address.
Method 2: One-Time Address Feature:
Use the "One-time address" feature for stops that aren't frequently used. Convert a one-time address to permanent with a click if needed.
Method 3: Save via Interactive Map:
Right-click on the map to display available address data and geocoordinates.
Use the address icon on the right top corner to save the address permanently or as a one-time address.
This method is useful when an address can't be found via the entry bar.
10. Watch Video
Managing addresses is now a breeze with our comprehensive "Address Management" feature. Easily add new addresses, edit existing ones, and categorize them based on your needs. The built-in search function saves you time. Whether you need to save addresses permanently or use them as one-time addresses, IMPARGO has got you covered.