Table of Contents
- View Active Order
- View Order and Stop Details
- Update Order Progress
- Process Loading Units
- Process Bulk Products
- Upload PODs, Weighing Documents & Comments
- Skip a Loading Unit or Bulk Product
IMPARGO Knowledge Center
Unleash the full potential of our software with our comprehensive Knowledge Center, offering detailed information on its functionality and features.
The IMPARGO DriverApp helps drivers easily view and complete their assigned orders. Follow the steps below to open and view your active order.
Step 1: Open the DriverApp.
Go to the Home Screen of the app.
Step 2: Find your assigned order.
As soon as an order is assigned to you, it will appear on the Home Screen.
Step 3: Tap the order card.
This opens the order details page where you can see all information about the shipment.

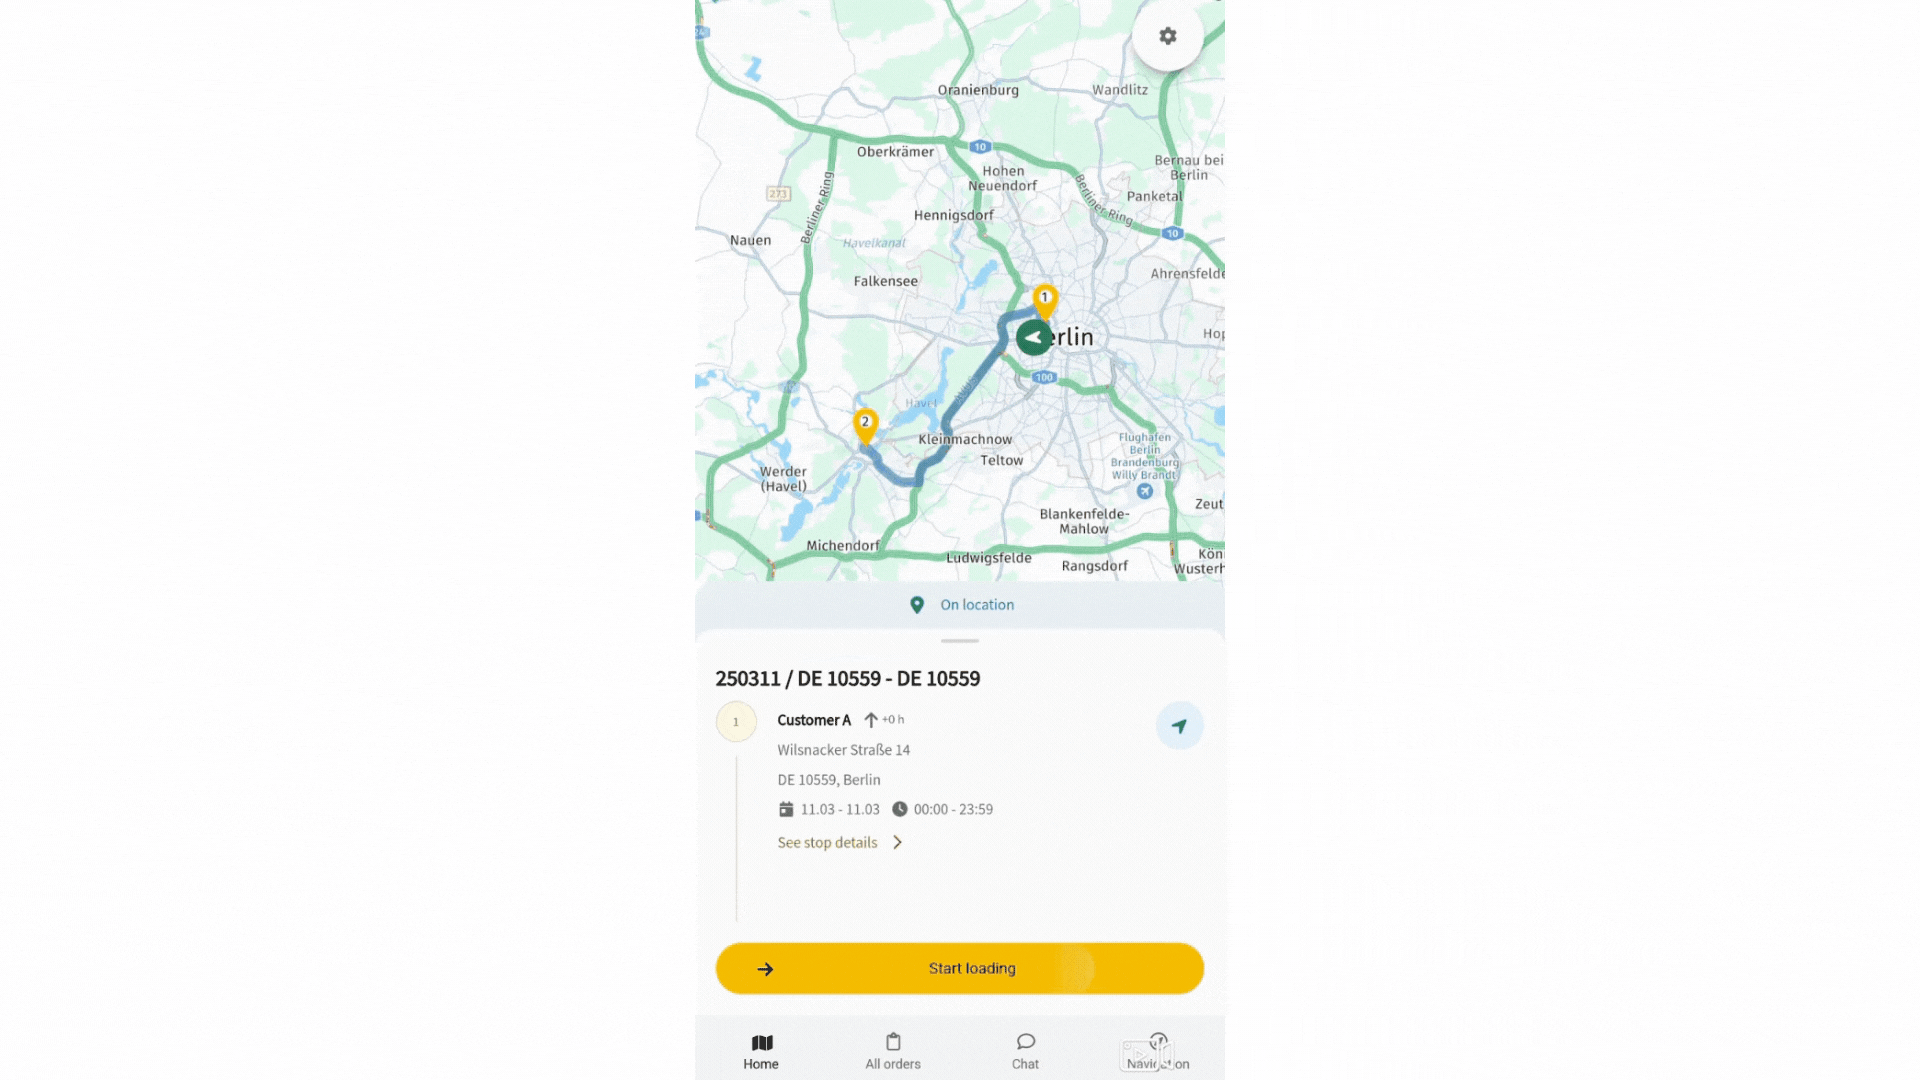
After opening the order, you can view important details about the vehicle, stops, and schedule. Follow the steps below.
Step 1: Review the order and vehicle information.
You can see:
Step 2: Check the stop details.
The stop section shows:
Step 3: Copy helpful information (optional).
Long-press any address, note, or instruction to copy it for easy navigation or communication.

While completing your route, make sure to update the stop status and upload documents when needed. Follow the steps below.
Step 1: Update the stop status.
Choose the correct status based on what you are currently doing at each stop.
Step 2: Add comments (optional).
Use the comment field to share information about delays, issues, or anything important.
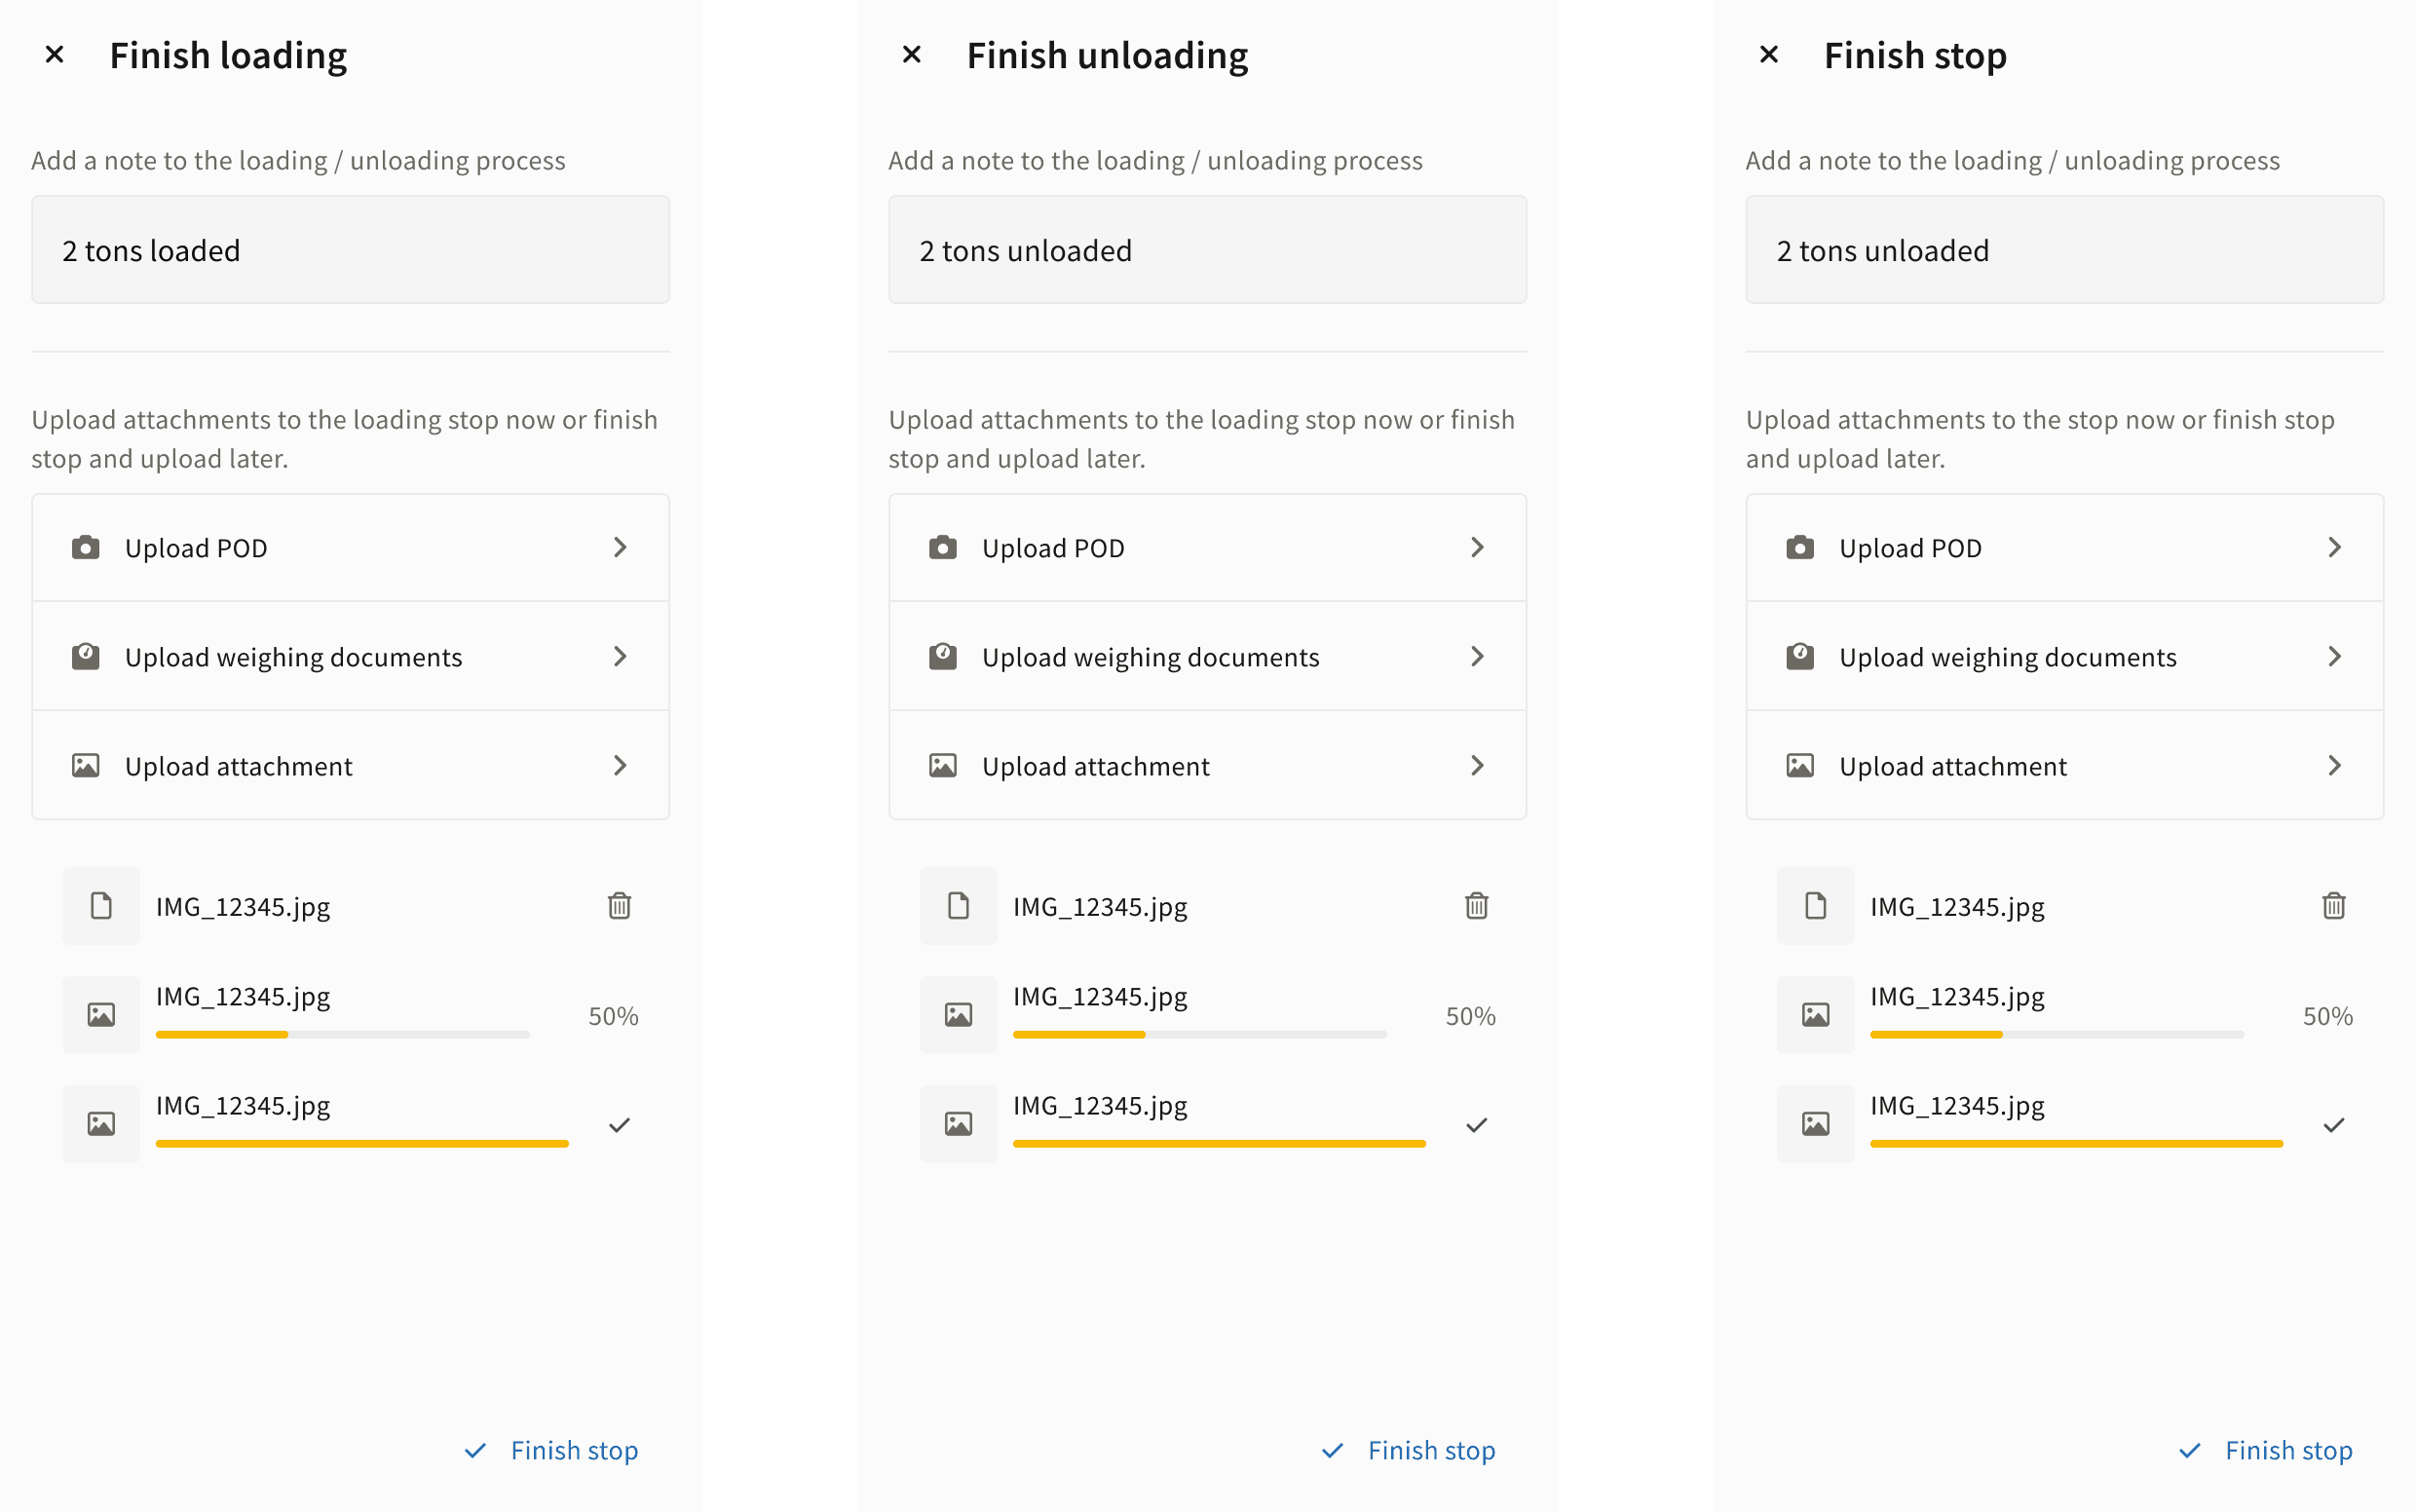
Step 3: Upload documents.
Take photos or upload Proof of Delivery (POD) documents when required.
Step 4: Complete the order.
When you have finished the final stop and marked it as Finished, the entire order will automatically change to Complete in the DriverApp.
The sections below go one level deeper — into the individual loading units and bulk products on each stop: confirming what's actually on the truck, recording the real weighbridge quantities, attaching a document to a specific item, and skipping anything you can't load.
A loading unit is any cargo you count as discrete pieces — pallets, containers, parcels, drums. Open the stop, see the list of loading units assigned to it, and confirm each one as it's physically loaded onto or unloaded from the truck.
Step 1: Open the order.
From the Home Screen, open the order containing the loading units you need to process.
Step 2: Open the stop.
Tap the loading stop. The screen lists every loading unit attached to that stop, with its type (e.g. EUR pallet), planned quantity, and load reference.

Step 3: Confirm what's loaded.
Tap each loading unit row to mark it as loaded. If the planned quantity matches what's physically on the truck, confirm directly. If not, adjust the quantity inline before confirming.
Step 4: Finish loading at the stop.
Once every loading unit at the stop is confirmed, select Finished Loading. This closes out the loading activity at this stop and updates the order status for the dispatcher.

Step 5: At the unloading stop, repeat for delivery.
When you arrive at the unloading stop, the same flow runs in reverse. Tap each loading unit to confirm delivery, adjust the quantity if it differs from what was loaded, and select Finished Unloading to close out the activity.

A bulk product is cargo measured by quantity rather than counted units — cement by the tonne, diesel by the litre, gases by the cubic metre. Bulk products appear on the same stop-by-stop view as loading units, but with quantity fields tuned for weighbridge (truck scale) tickets and meter readings instead of piece counts.
Step 1: Open the order.
From the Home Screen, open the order containing the bulk product you need to process.
Step 2: Open the stop.
Tap the loading stop. The screen lists every bulk product attached to that stop, with its type (e.g. Solid - Portland Cement CEM I 42,5 R), planned quantity in the unit set by the dispatcher (tonnes, litres, or cubic metres), and load reference.

Step 3: Confirm what's loaded at the weighbridge.
Tap each bulk product row. If the planned quantity matches the weighbridge reading, confirm directly. If the weighbridge shows a different figure — which it usually does for bulk cargo — enter the actual quantity before confirming. The dispatcher's cost and price automatically recalculate in the background.
Step 4: Finish bulk loading at the stop.
Once every bulk product at the stop is confirmed with its actual quantity, select Finished Loading. This closes out the loading activity for bulk cargo and updates the order status for the dispatcher.

Step 5: At the unloading stop, confirm delivery.
At the unloading stop, the same flow runs in reverse. Confirm each bulk product with the unloading-side weighbridge reading, then select Finished Unloading to close out the activity. Loading and unloading quantities can differ — this is normal for disposal goods, gases that vaporise during transport, and liquids with measured losses.

The end-to-end bulk product flow — open the stop, confirm the weighbridge reading, finish loading, and the dispatcher view updating live — runs in a few taps.

Every stop activity supports document uploads and free-text comments. A weighbridge ticket photo, a proof-of-delivery signature, a damage report, a note about the receiving party being late — anything that needs to live with the order travels through the DriverApp.
Step 1: Open the order.
From the Home Screen, open the order containing the item that needs a document or comment.
Step 2: Open the loading unit or bulk product detail panel.
From the stop view, tap the item you want to attach a document or comment to.
Step 3: Upload the document.
Tap the upload control and either take a new photo (weighbridge ticket, signed POD, damage photo) or pick from your phone's gallery. The document attaches to that specific item, so the dispatcher knows exactly which load it relates to.
Step 4: Add a comment if needed.
Use the comment field to add context — for example, Customer signed under protest, see POD photo or Bridge ticket reads 23,8 t after settling. Comments are attached to the item like documents and are visible to the dispatcher immediately.
Sometimes the cargo on the ground doesn't match the order. The customer cancels two of the five pallets at the gate; the silo runs dry before the planned 24 t are loaded; one of the drums is leaking and the driver refuses it. The DriverApp lets you skip any loading unit or bulk product without breaking the rest of the order.
Step 1: Open the order.
From the Home Screen, open the order with the item you can't load.
Step 2: Open the item's detail panel.
Tap the loading unit or bulk product you can't load.
Step 3: Use the skip action.
Choose the skip option from the detail panel. The item is marked as not loaded for this run.
Step 4: Leave a comment explaining why.
Always add a comment when you skip — Customer reduced order at gate, Silo empty, only 18 t available, Drum #3 leaking, refused at loading. The dispatcher needs to know whether to reschedule, invoice partially, or trigger a customer claim.
Step 5: Finish the stop activity as normal.
With the skipped item handled, finish loading or unloading the remaining items as usual. The order moves forward and the skipped item is preserved in the audit trail.
Note: Everything you confirm here reaches the dispatcher live. For the office side — the order's Events tab, how adapted quantities and skipped items appear, and the PDFs that include them — see Manage Bulk Products in Your Orders.
© IMPARGO 2026, All rights reserved.