IMPARGO Knowledge Center

Unleash the full potential of our software with our comprehensive Knowledge Center, offering detailed information on its functionality and features.

  • PLANNER: Truck, Toll & Tour Calculation
  • ORDERS: Order Management
  • ORDERS: Offer Management
  • FLEET: Execute With The DriverApp
  • DISPATCH: The Dispatch Board for Trucks
  • DRIVERAPP: Order Execution & Truck Navigation for Drivers
  • Managing Master Data
  • Analytics
  • Help Center
  • Integrations

Execute Relay Trucking via Swap Points

When your transports involve long distances, drivers traveling in opposite directions, or a consolidation hub, you can execute orders via a swap point. This strategy, often referred to in the industry as Relay Trucking or Trailer Swapping, lets two drivers meet at a defined location, exchange trailers, and continue their trips, all within one consistent workflow.

The same split mechanism also powers hub handover: drive several orders to a hub first, then let another vehicle or partner handle the onward delivery. This feature helps dispatchers optimize driving times, reduce driver downtime, and return drivers to their home base, all while keeping the customer billing structure intact.

Terminology

  • Original Order: An order before you split it. It appears in both the Transports (Execution) and Shipments (Documentation) views; while untouched, it carries no icon.
  • Split Order: An order you have split at a swap point. It keeps a Split orders tab and is marked with a split icon in the Shipments view.
  • Split leg (Split leg 1 / Split leg 2): The two sub-orders a split creates, one run to the swap point and one from it. Each can be assigned to a driver or fused on its own.
  • Tour: Two or more orders or split legs fused into one transport unit; it carries a branching icon in the Transports view.
  • Order in tour: A leg or order once it has been fused into a tour; it carries an arrow icon.


Table of Contents

  1. What Is A Swap Point?
  2. When To Use A Swap Point
  3. How To Execute An Order Via Swap Point
  4. Consolidate Orders at a Hub (Hub Handover)
  5. Managing Split Orders And Statuses
  6. Find Split Orders and Tours Across Views


1. What Is A Swap Point?

A swap point is a meeting location where two drivers exchange trailers (swap bodies). It lets you split a single transport order into two operational legs (for example, a Feeder leg and a Linehaul leg) while keeping the original order linked for administrative purposes. The swap point can be a parking area, a terminal, a customer site, or a hub where several transports come together.

Example Scenario

You have a transport order moving from a Warehouse Location to a Customer Location. The route exceeds daily driving limits, so you decide to swap trailers at a Berlin Dropoff point. By selecting Berlin Dropoff as the swap point, the system automatically generates two legs:

  • Warehouse Location → Berlin Dropoff
  • Berlin Dropoff → Customer Location


2. When To Use A Swap Point

Use this feature to optimize logistics operations when:

  • Compliance: You need to adhere to strict driving and rest time regulations by splitting a long route between two drivers.
  • Relay Operations: Two drivers drive from opposite directions and need to exchange trailers to return to their respective home bases.
  • Hub consolidation: You run several orders to the same hub, then a different vehicle or partner delivers onward. Split each order at the hub, then fuse the matching legs into tours (see Section 4).
  • Billing consistency: You need to plan a swap operation while keeping one main order for simple invoicing.


3. How To Execute An Order Via Swap Point

Follow these steps to split an order at a swap point in the IMPARGO TMS.

Step 1: Open the order. 
Go to the Orders module and open the transport order you want to execute via swap. Only orders with exactly two stops (pickup + delivery) can be split.

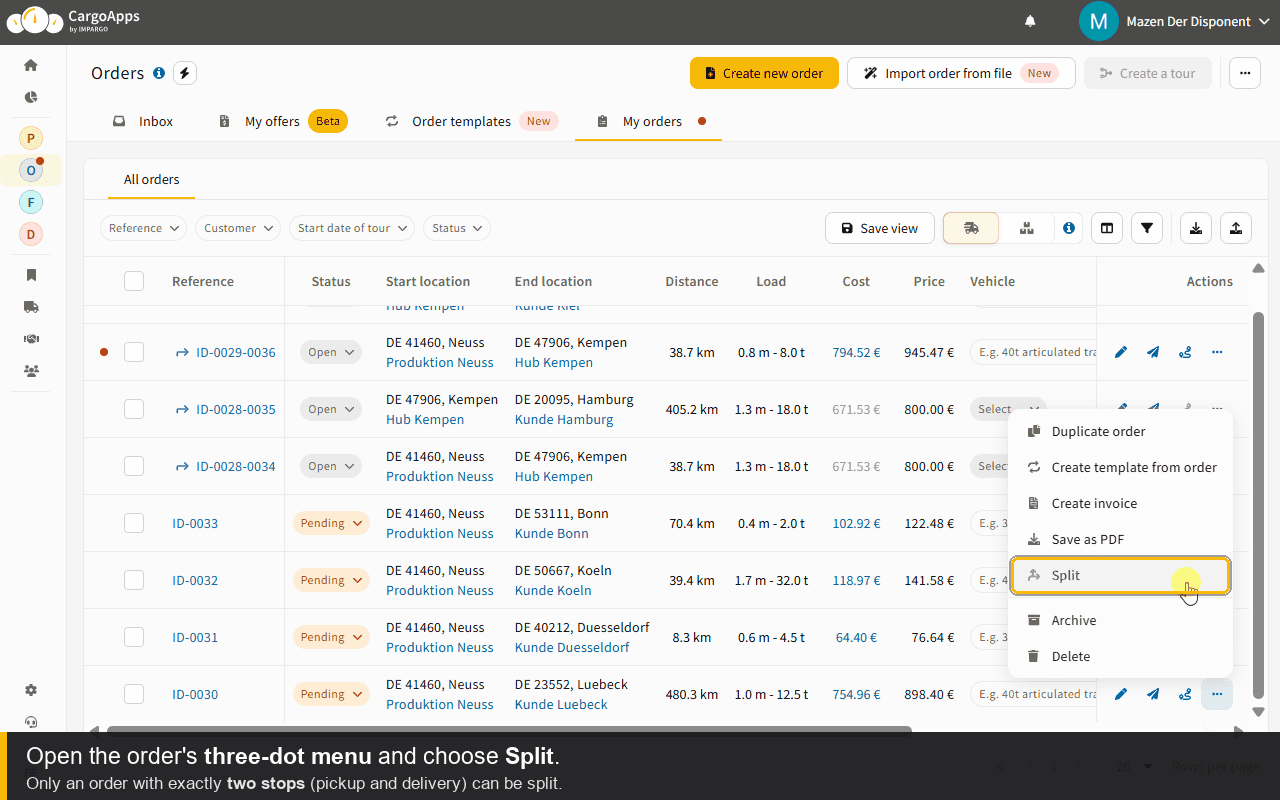
Step 2: Select Split. 
In the order's three-dot menu, choose “Split”. This opens the Split Order modal, where you define how the order is divided.

Choose Split from the order's three-dot menu


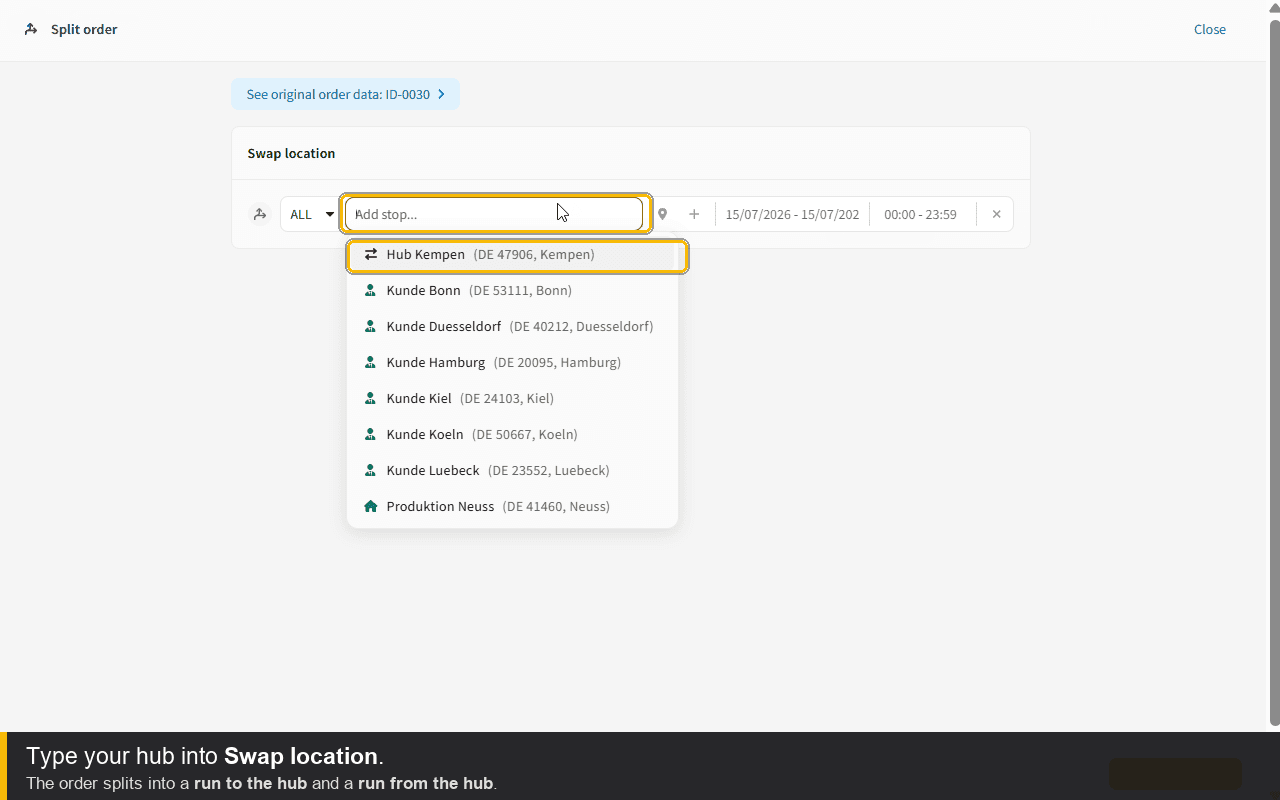
Step 3: Define the swap point. 
Enter the swap point location. Type it manually or choose an existing address (for example, a parking area, customer site, terminal, or hub). You must enter a swap point before proceeding, otherwise the system shows an error message.

Enter the swap point location
Enter the swap point (for a hub handover, this is your hub)


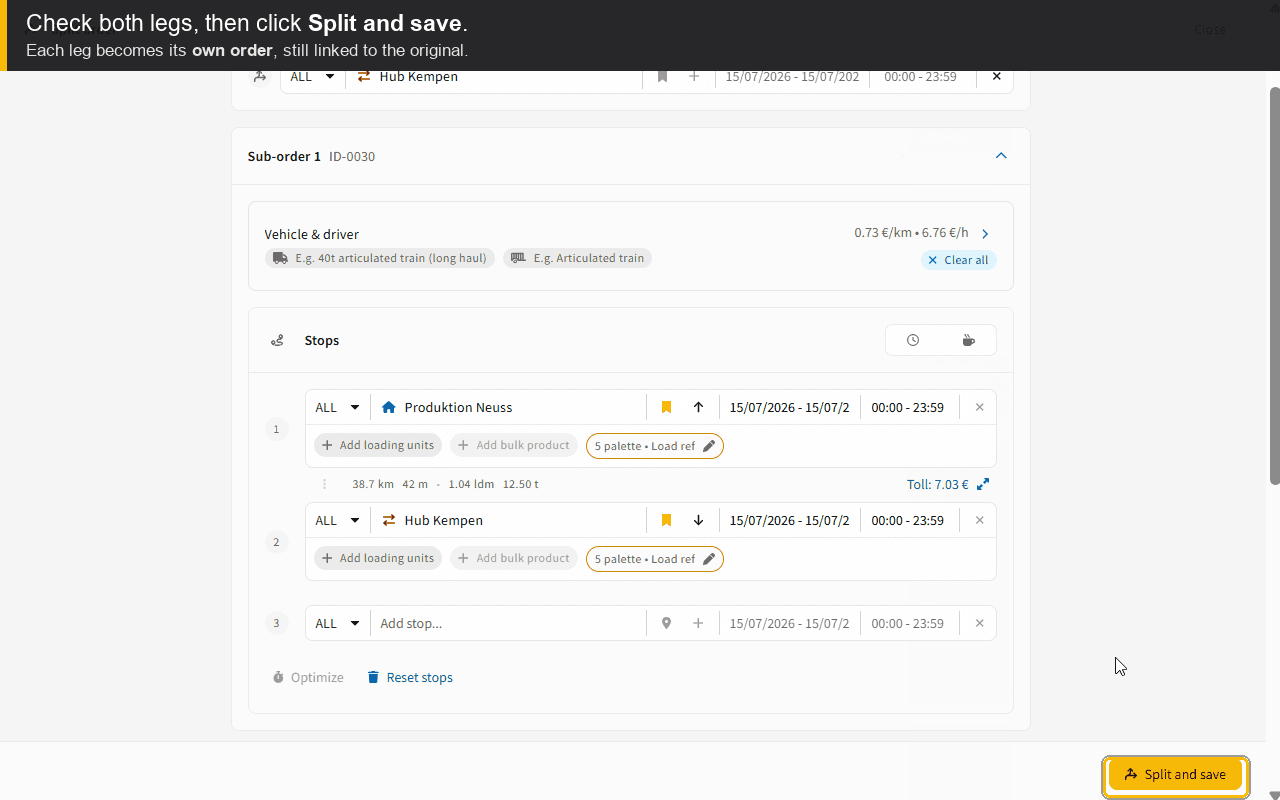
Step 4: Review the split. 
The system automatically creates two sub-orders: the first leg (Pickup → Swap Point) and the second leg (Swap Point → Delivery). Sub-orders inherit all order details except Assets (vehicle, trailer, and driver). Time management is inherited but remains editable.

Step 5: Save the split. 
Click Split and Save to confirm. A notification dot appears on the new Split Orders tab in the original order, and the two sub-orders are listed as Split leg 1 and Split leg 2, each with its own autogenerated reference number.

Review both legs and click Split and Save
Review both legs, then Split and Save


Step 6: Assign drivers and assets, then handle billing. 
Assign a different driver, truck, and trailer to each leg; drivers receive only their assigned leg. The original order stays intact for billing (a system note "This order is executed via swap point" is added), and all comments and documents are shared between the original and its split orders.


4. Consolidate Orders at a Hub (Hub Handover)

Splitting is not only for two-driver relays. It is also how you run hub-based transport, where several shipments are collected at a hub before a second vehicle or partner completes the delivery. Because you can now fuse split legs, you can plan the whole flow end to end, right here in the Orders module.

Use Case
Several orders leave the same origin for different customers, but everything first runs to a shared hub. A local truck feeds the hub; a partner then distributes onward. You split each order at the hub, group the feeder legs onto one vehicle, and hand the delivery legs to the partner, without losing the link to each original order.

Step 1: Split each order at the hub. 
Using Section 3, split every order that passes through the hub, entering the hub as the swap point. Each order becomes a feeder leg (to the hub) and a delivery leg (from the hub).

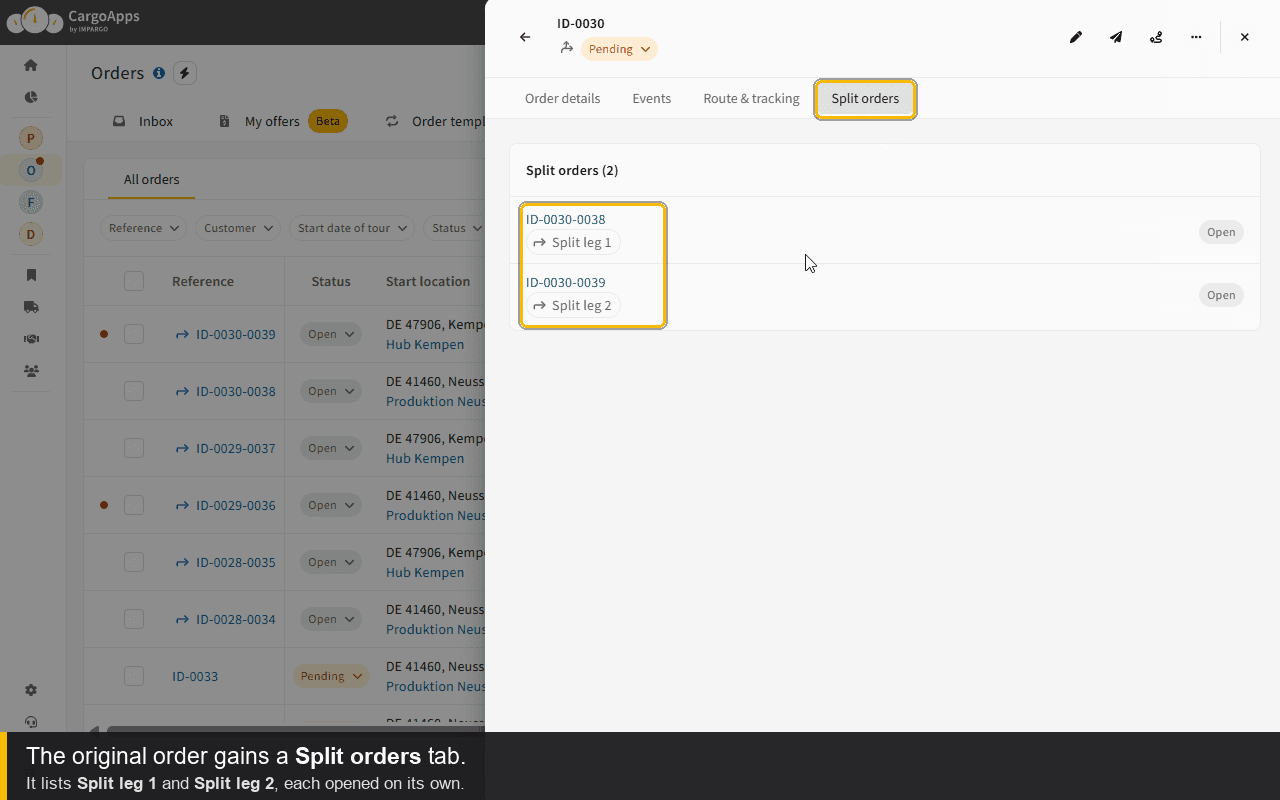
Step 2: Check the legs on the original order. 
Open the original order's Split Orders tab. It lists Split leg 1 and Split leg 2, each openable on its own, so the shipment stays linked to how it is executed.

Split orders tab on the original order listing Split leg 1 and Split leg 2
Every split order keeps a Split orders tab listing its legs


Step 3: Select the matching legs and create a tour. 
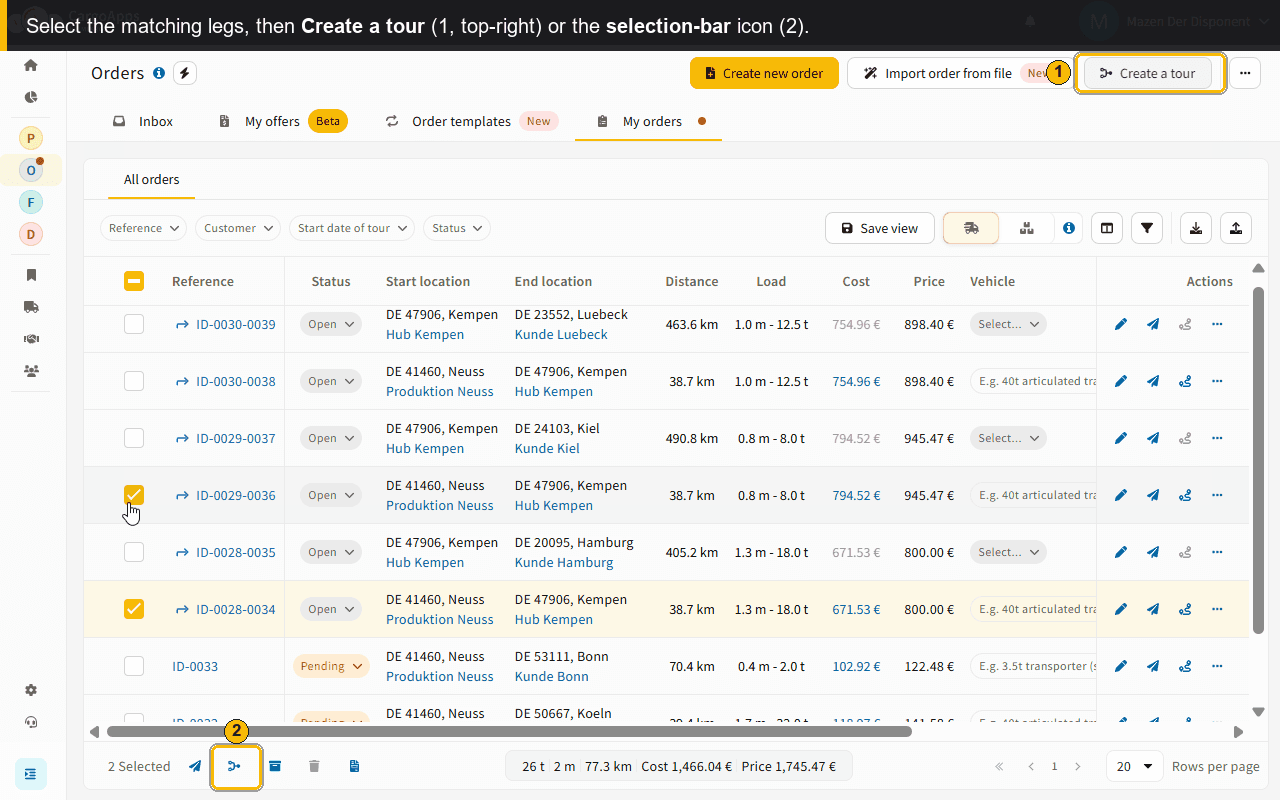
In the Orders table, select the legs that share a route, for example all feeder legs to the hub, then click Create a tour (top-right, or the tour icon in the selection bar).

Select the feeder legs and click Create a tour
Select the feeder legs, then create the pickup tour


Step 4: Merge the shared hub stop. 
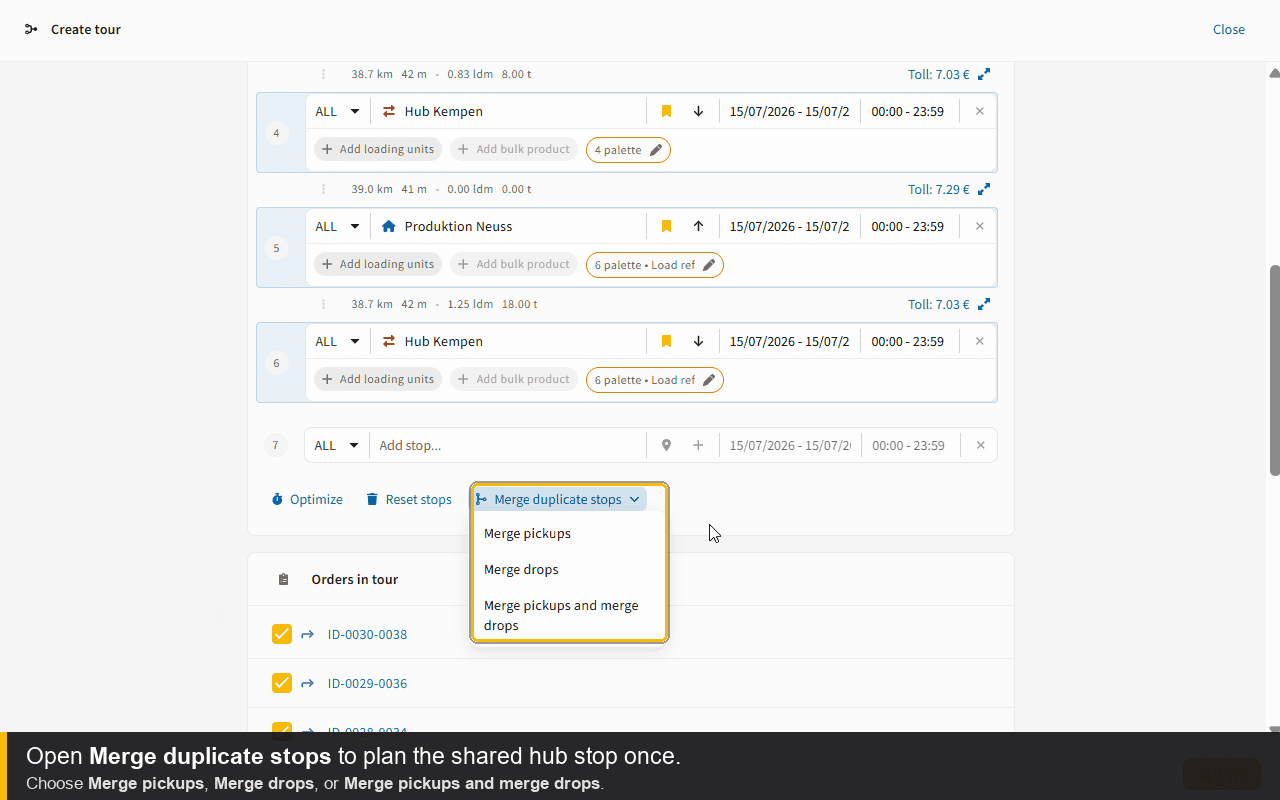
Because every feeder leg ends at the same hub, open Merge duplicate stops and choose Merge pickups, Merge drops, or Merge pickups and merge drops, so the hub is planned once.

Merge the duplicate hub stop when creating the tour
Merge the duplicate hub stop so it is planned once


Step 5: Review the tour data and save. 
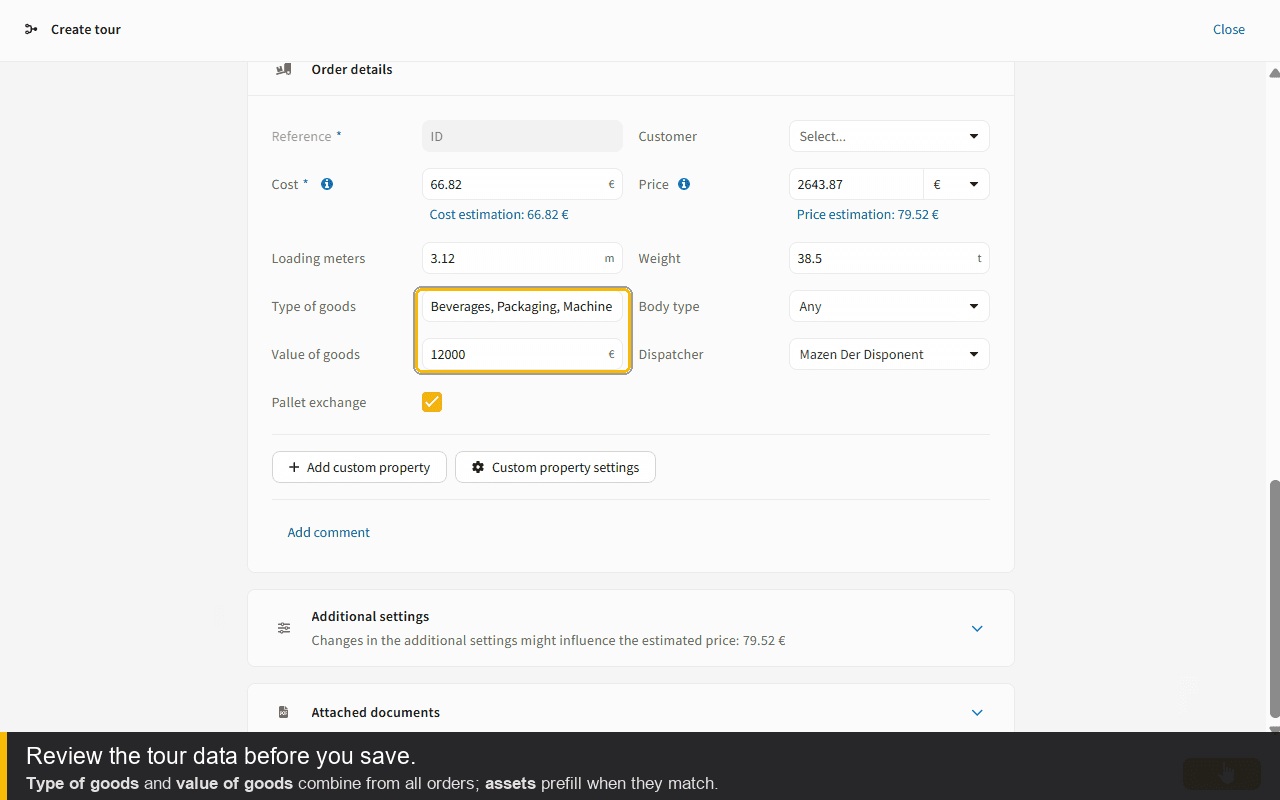
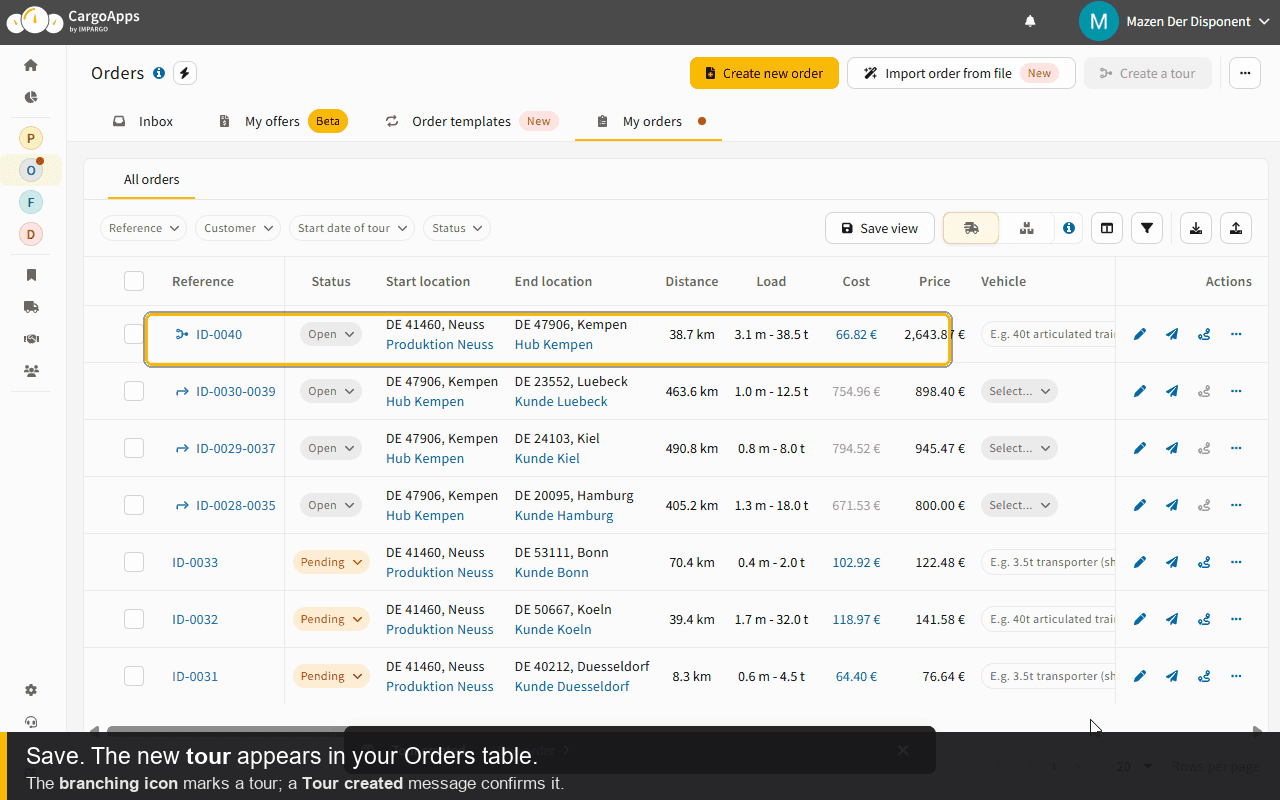
The tour combines the legs' data (goods, price, weight) and prefills matching assets. Review it, then save. The pickup tour then appears in the Orders table with the branching icon.

Review the pickup tour data before saving
Review the combined tour data before saving


The pickup tour appears in the Orders table
The pickup tour now sits in your Orders table


Step 6: Check the orders in the tour, and repeat for the delivery legs. 
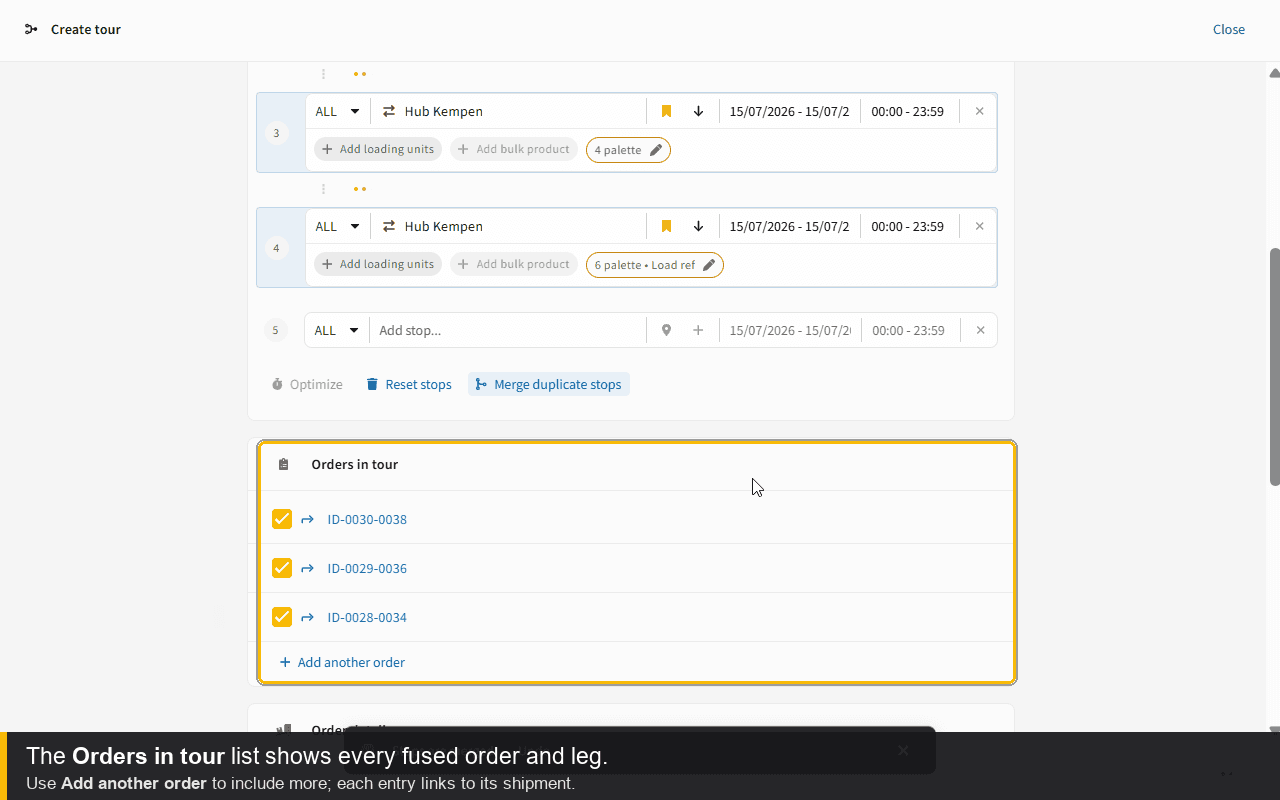
Open the tour's Orders in tour list to confirm the feeder legs it contains. Then fuse the delivery legs into a second tour for the partner the same way.

Orders in tour list showing the fused feeder legs
The Orders in tour list confirms the legs in the pickup tour


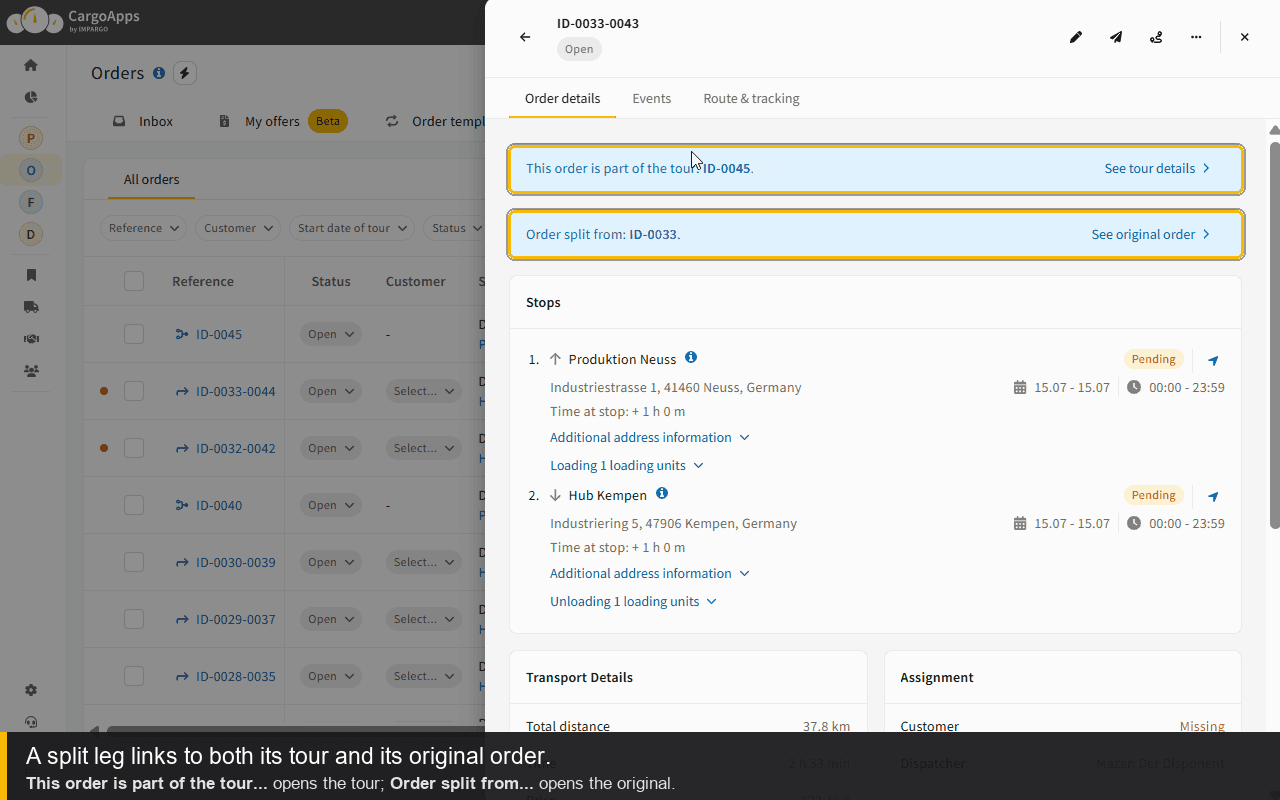
Each split leg keeps two links, so you can move between the tour that executes it and the original shipment it was split from:

A split leg links to both its tour and its original order
"This order is part of the tour..." opens the tour; "Order split from..." opens the original


For the full fusion reference (all rules, asset prefill, and options), see Create a Tour from Orders.


5. Managing Split Orders And Statuses

It helps to understand how statuses, events, deletions, and restrictions work so you can manage your workflow effectively.

Order Status Logic

Each order, both the original and the split sub-orders, is handled independently based on the status of its stops.

  • If one of the stops in a split order is In progress, that split order is also In progress.
  • Once a split order is In progress, the original order automatically moves to In progress.


Events

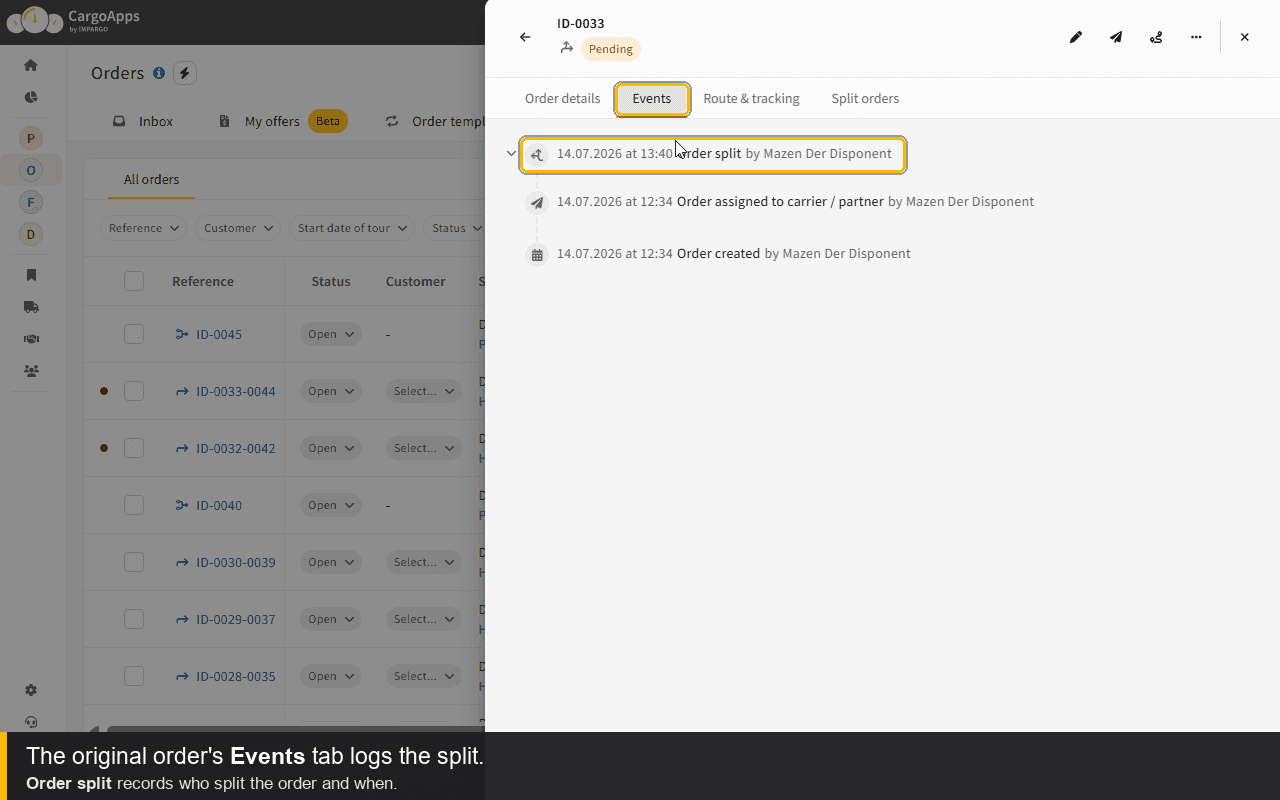
The original order's Events tab logs the split (who split it and when).

The original order Events tab logs the split
The original order's Events tab logs the split


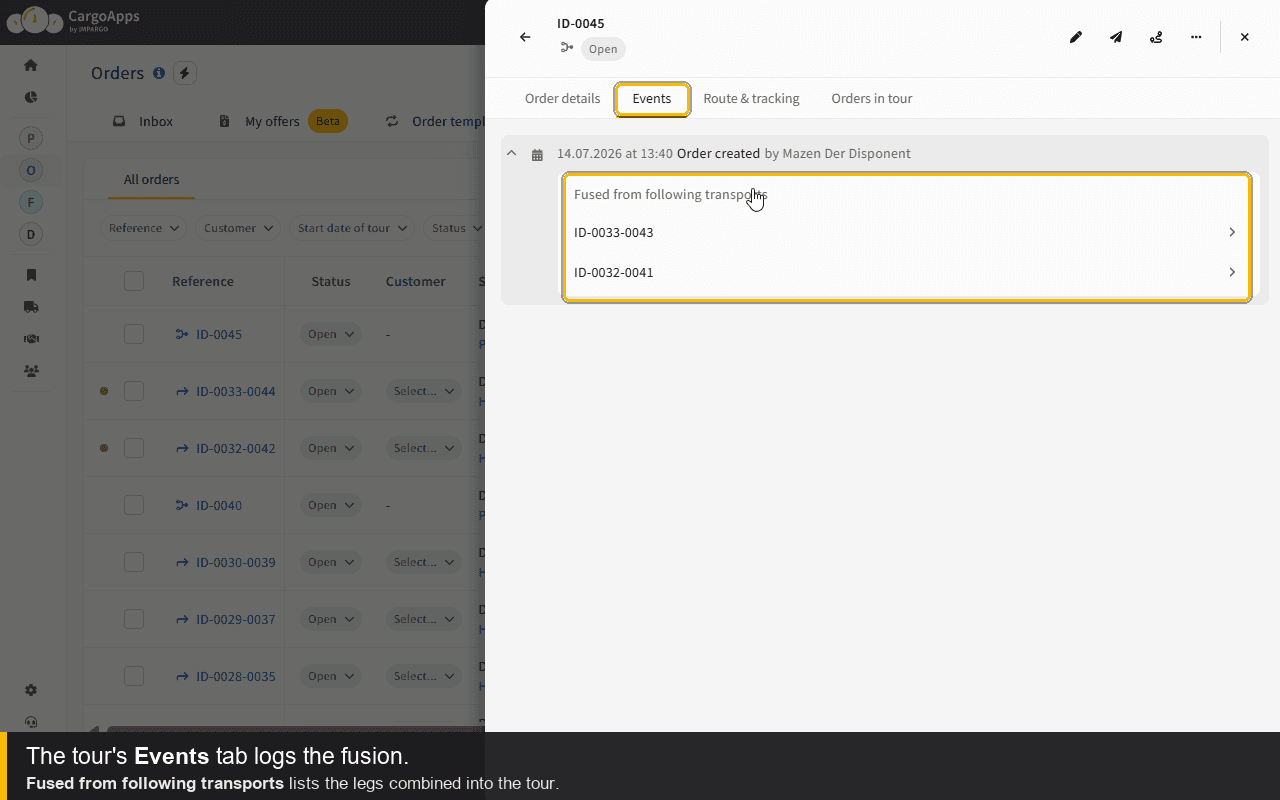
Once a leg is fused, the fusion is logged too, so the full history stays traceable.

The tour Events tab lists the transports fused into it
Fused from following transports lists the legs combined into the tour


Linked Order Behavior

The original order and its sub-orders are linked. Here is how actions affect them:

  • Archiving the original order: Sub-orders stay active.
  • Deleting the original order: Sub-orders are deleted automatically.
  • Archiving a sub-order: No effect on the original order.
  • Deleting a sub-order: Disabled.


Fusing Split Legs

Split legs can be fused into a tour, on their own or together with untouched orders. This is what makes the hub handover in Section 4 possible. See Create a Tour from Orders for the complete fusion reference.

Restrictions

There are specific limits when splitting. You cannot split:

  • Orders with more than two stops.
  • Orders that have already been split.
  • Tours.
  • Orders already in a tour.
  • Fused orders.


Note: Splitting happens at a single hub. Multi-stop splits and splitting across several hubs are not supported.


6. Find Split Orders and Tours Across Views
After you split (and fuse), use the view toggle above the Orders table to find each order, and read the icon before the reference to tell the types apart.

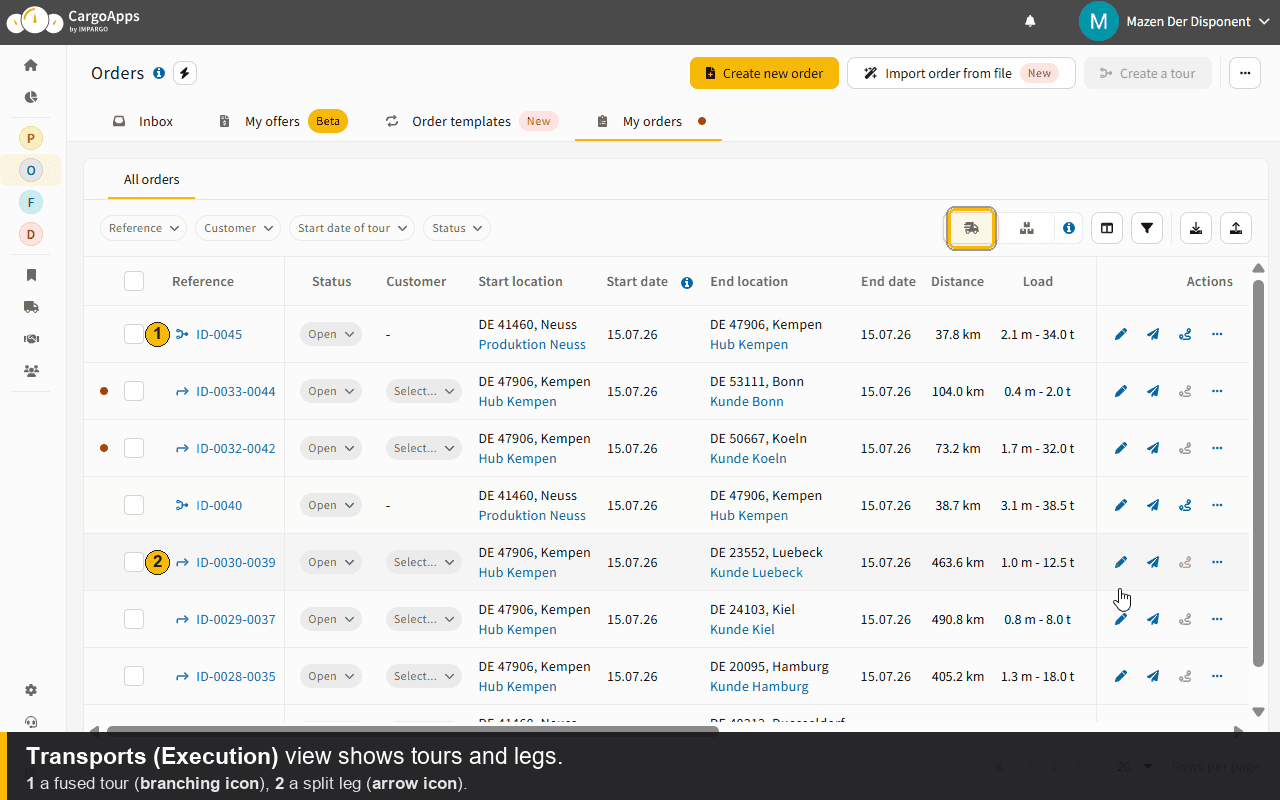
Transports (Execution view) shows what you dispatch: tours and standalone legs. A branching icon marks a tour; an arrow icon marks a split leg or an order in a tour.

Transports Execution view showing tours and split legs
Transports (Execution view): tours (branching icon) and legs (arrow icon)


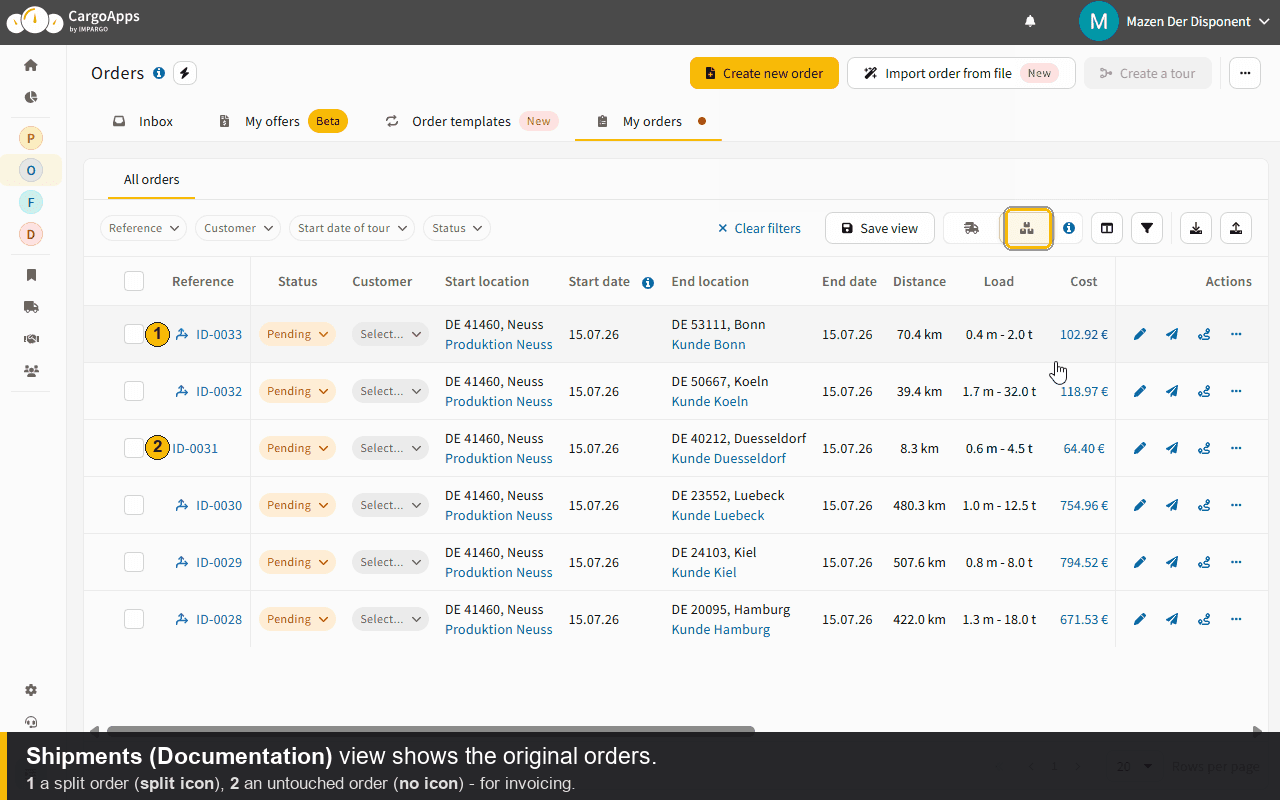
Shipments (Documentation view) keeps every original order for invoicing, even after it is split or fused. A split order carries a split icon; an untouched original order has no icon.

Shipments Documentation view showing the original orders
Shipments (Documentation view): split orders (split icon) and untouched orders (no icon)


Run relays and hub handovers in one workflow
See how IMPARGO TMS splits, swaps, and fuses orders while keeping one clean billing trail, trusted by over 20,000 dispatchers across the EU.
Book a demo  Open the Orders module

Create a Tour from Orders

Edit Transport Order


Impargo-logo

Digitalize your transport business overnight.

© IMPARGO 2026, All rights reserved.